|
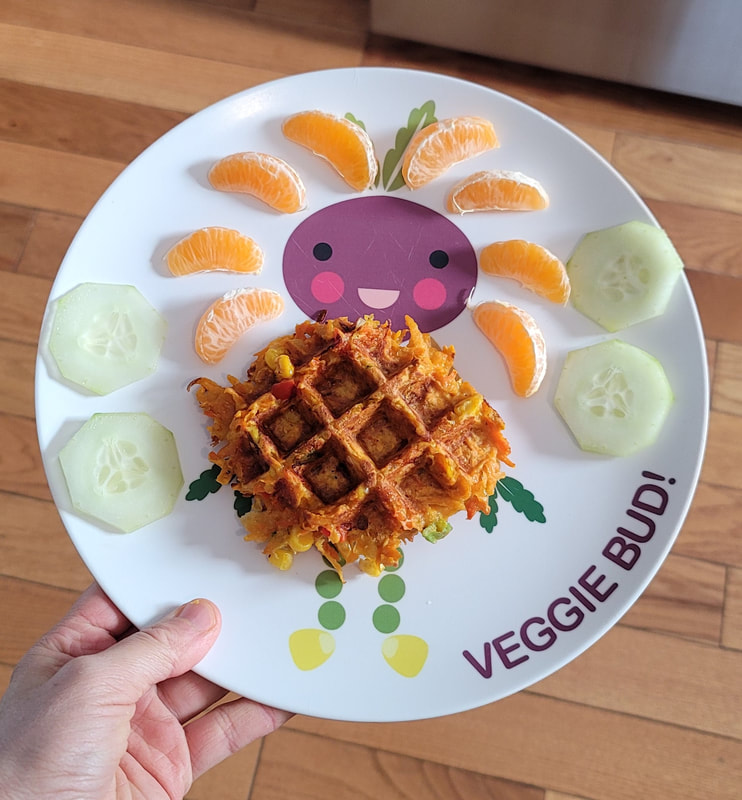
These savory veggie-packed waffles are great for breakfast, lunch, or a snack any time of the day. Experiment with the ingredients, you can add or omit veggies from this recipe and still have a delicious outcome! These Rainbow Veggie Waffles taste great paired with sour cream and/or applesauce, you can find our recipe for pretty pink Beet Applesauce here.
"Learn to Love Veggies" Tip
Give your child some "power" over this recipe and have them help pick out the veggies for these savory waffles! The base of the waffles are shredded sweet potatoes and carrots but the extras are very flexible. We have used sweet corn, bell pepper, and green onion in this recipe but you can add or omit these... some other great veggies that you can include are cubed zucchini, frozen peas, chopped green beans, and fresh herbs!
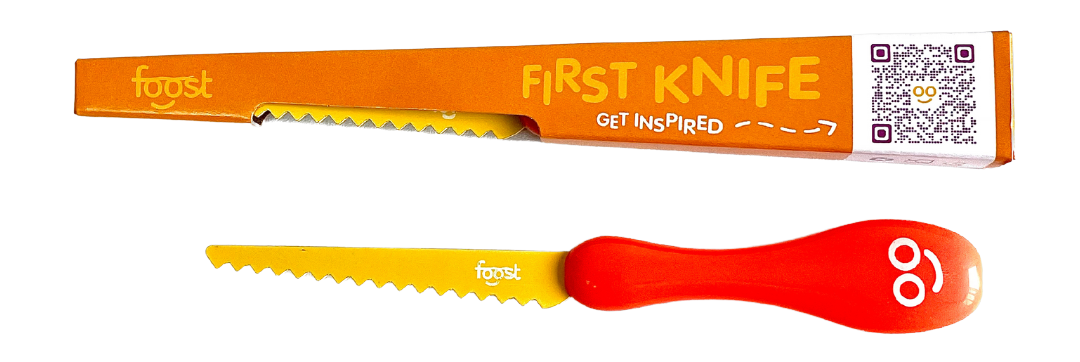
Get cooking with your kids! Purchase our recommended kid-safe knife from our friends at Foost :)
0 Comments
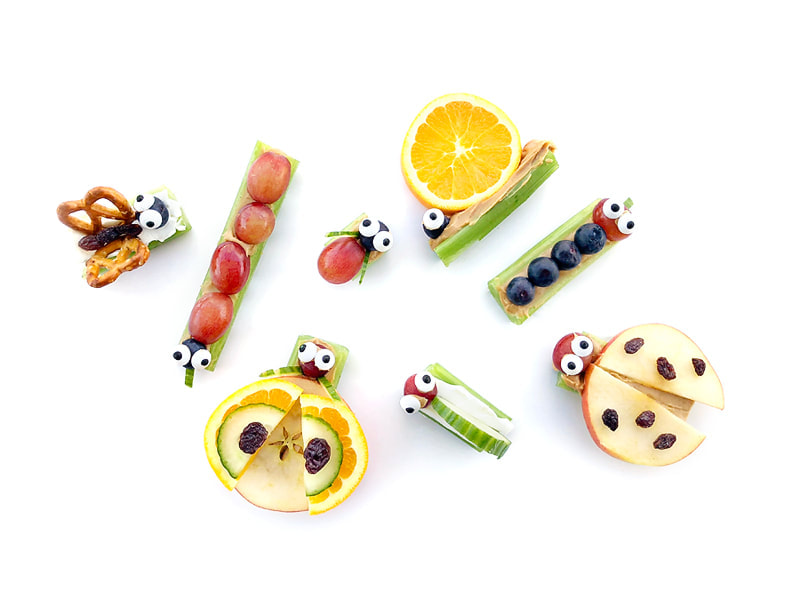
We have featured many simple veggie art projects for kids over the years here at Veggie Buds Club! Food art is a great way to get children interested in trying veggies. We "eat with our eyes", right?! So making food look pretty is a great strategy to get kids excited about eating it. Click on the links below to learn how to make each veggie art project or click here to see ALL of the veggie art projects that we have featured on our blog! Celery Bugs: Let your kids make their bugs and you might just be surprised by their creativity! From snakes to snails, ladybugs to butterflies, the possibilities are endless.
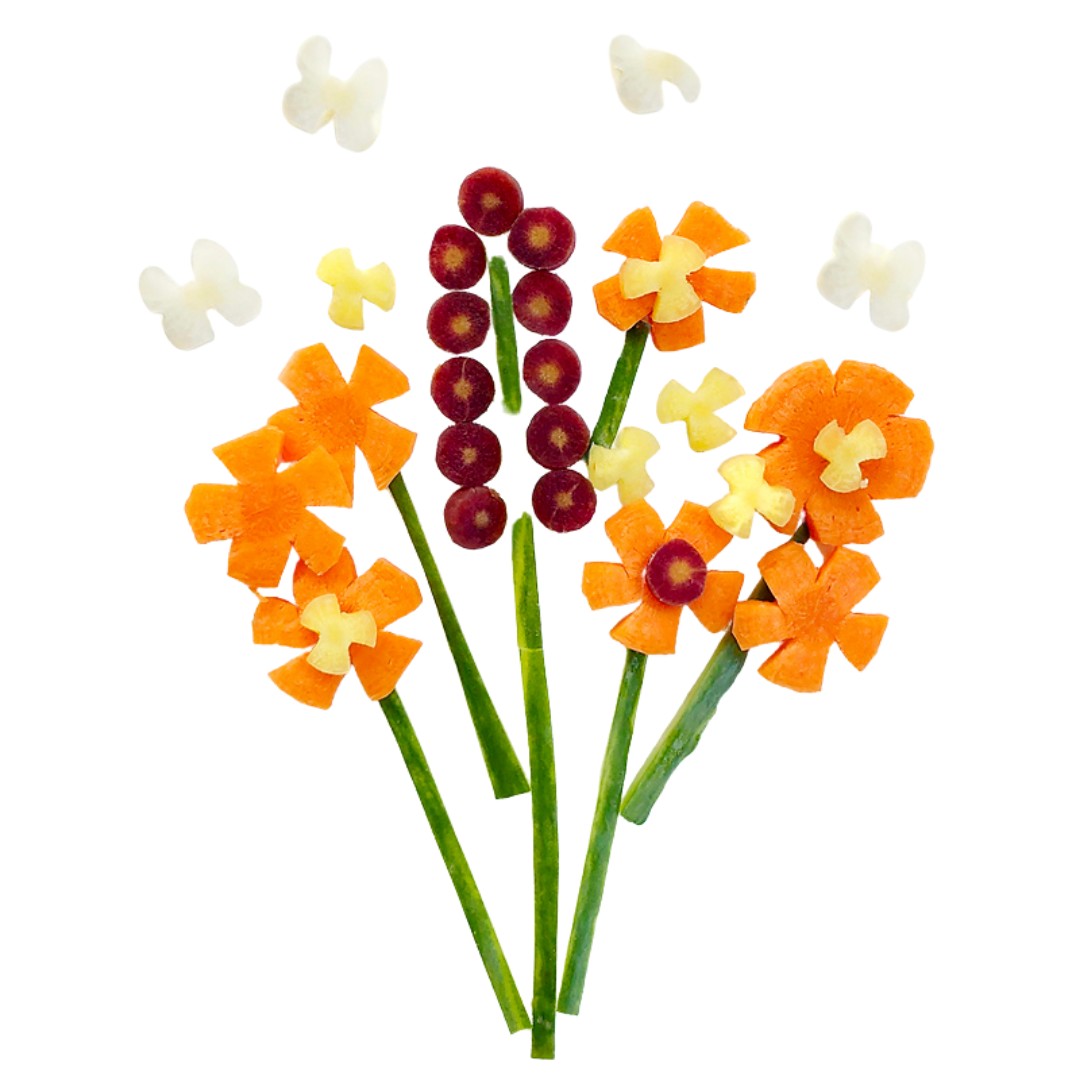
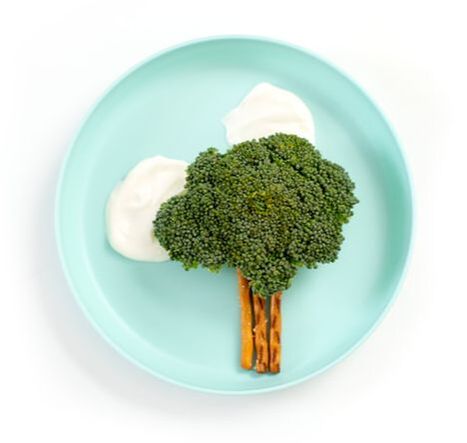
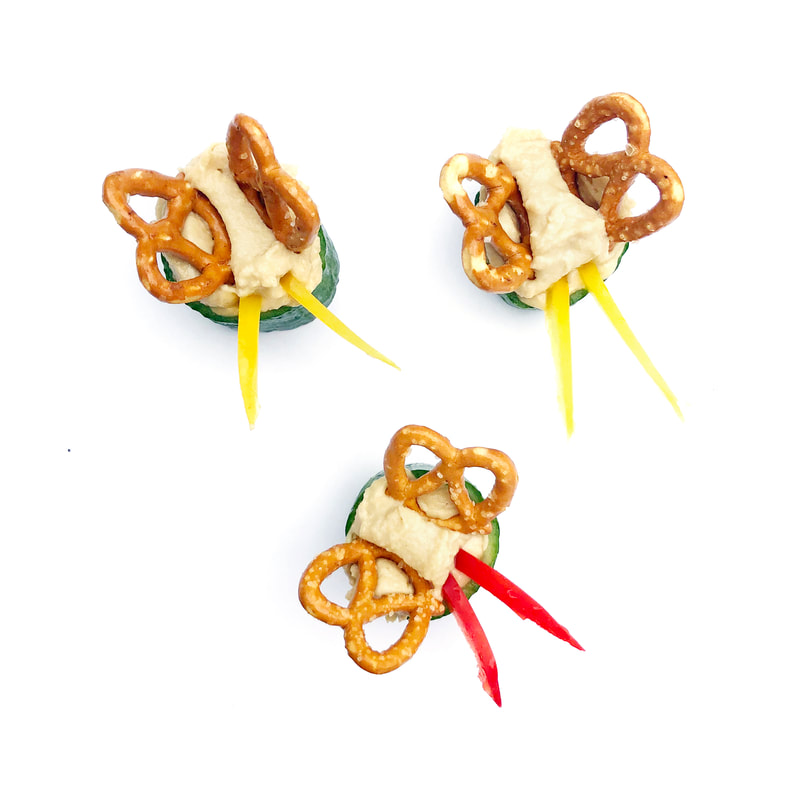
Carrot Bouquet: If your kiddos are still learning to like carrots, try making them into a fun flower shape! Radish Planet: Turning a radish into something that’s out of the world is super simple with just three tasty ingredients! Broccoli Tree: Broccoli florets look like little trees just as they are... so let's take it up a notch and make a whole scene for your forest! Cucumber Butterflies: These cucumber butterflies are so easy to make and so adorable! Onion Flower: Simply slicing and baking turns this veggie into a beautiful bloom!
Who knew that broccoli was such a party veggie?! And with a name like "Rockin' Broccoli Salad", this recipe is sure to sound exciting to kids who may not be too keen on salad.
Chef Dawn, from VegeCooking, developed this recipe for Veggie Buds Club. This "Rockin' Broccoli Salad" makes a great side dish for any picnic or gathering and is vegetarian/vegan. "Learn to Love Veggies" Tip
Let your child mix up the salad ingredients and taste the salad before the Creamy Dressing is added. Have your child whisk up the Creamy Dressing and stir it into the salad. Ask them, "How has the sweet dressing changed the flavor of our Rockin' Broccoli Salad?".
 Rockin' Broccoli Salad
Yield: 4-6
Prep time: 10 MinCook time: 4 MinTotal time: 14 Min
Who knew that broccoli was such a party veggie?! This Rockin' Broccoli Salad is a party in your mouth, full of sweet and savory flavors. It makes a great side-dish at any picnic or gathering and is vegetarian/vegan.
Ingredients
Salad
Creamy Dressing
Instructions
Check out our shop for products that teach kids to learn to love veggies! This includes veggie activity boxes, kid-safe knives, interactive placemats, and more!
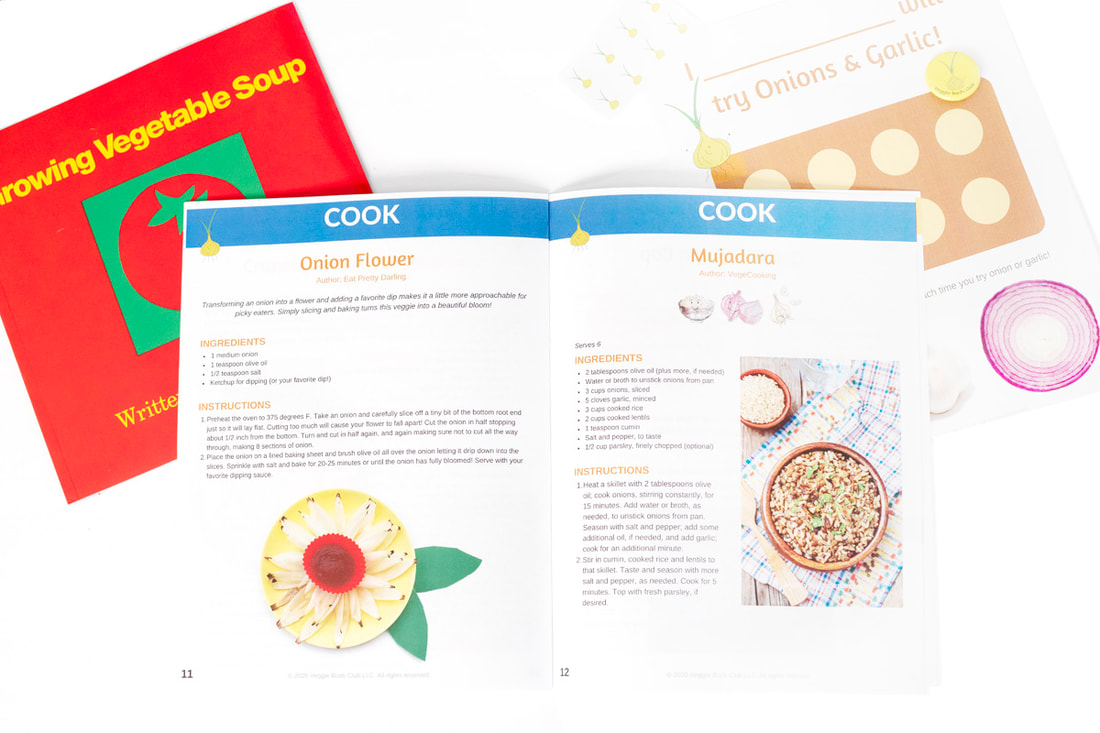
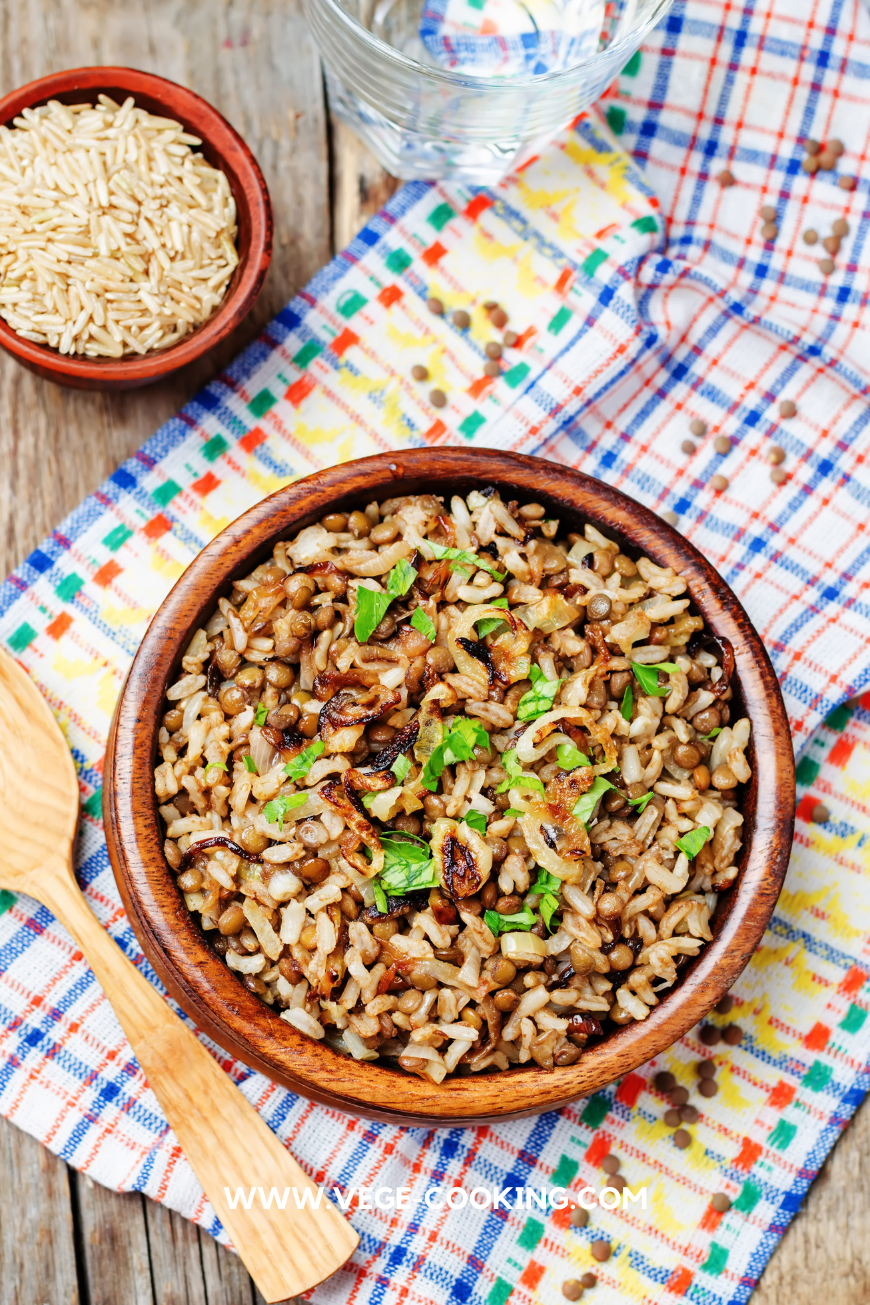
Mujadara is a pilaf featuring lentils, rice, and caramelized onions. This protein-rich combination of rice and lentils is a staple of Middle Eastern cuisine. Chef Dawn from VegeCooking shared this recipe with Veggie Buds Club that features onions and garlic!
"Learn to Love Veggies" Tip
Caramelizing onions really brings out the sweet flavor of this not so kid-friendly veggie. Have you child lick a raw piece of onion, before caramelizing it, and then have them try one caramelized and ask, "How has the flavor changed?" Really emphasize how awesome it is that a "spicy" onion can be transformed into such a sweet treat!
 Mujadara
Yield: 6
Prep time: 10 MinCook time: 20 MinTotal time: 30 Min
Mujadara is a pilaf featuring lentils, rice, and caramelized onions. This protein-rich combination of rice and lentils is a staple of Middle Eastern cuisine.
Ingredients
Instructions
Check out our shop for products that teach kids to learn to love veggies! This includes veggie activity boxes, kid-safe knives, interactive placemats, and more.
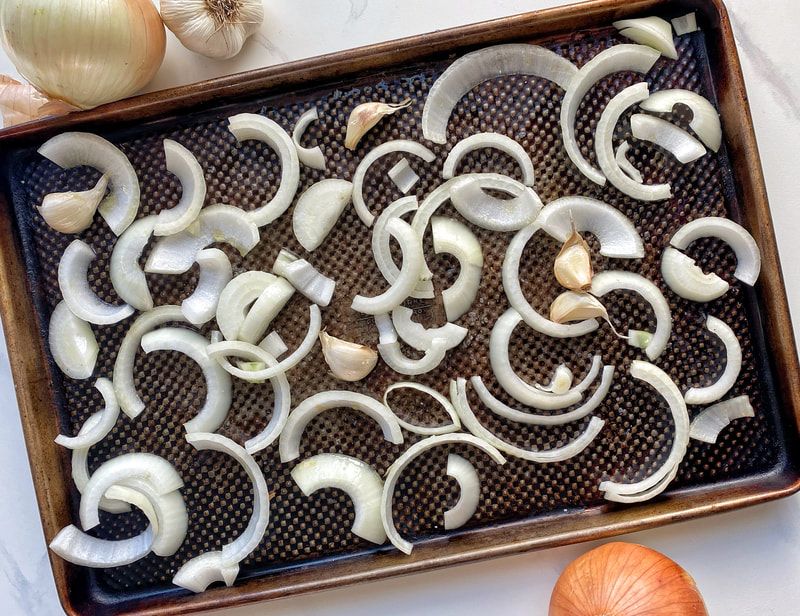
Made from just 4 ingredients, this pasta sauce is so simple but so delicious! Roasted sliced onion and whole cloves of garlic makes them super sweet and cuts out any of the “spicy” or strong flavor kiddos might not enjoy. Little chefs can help toss the onion and garlic in oil and sprinkle on salt before roasting. Then they can help add the can of tomatoes and blend up the sauce. Serve on top of or tossed with whatever kind of pasta your family enjoys. Spaghetti is our favorite. The flavorful tomato sauce is also great for pizza or any other recipe you’d use marinara.
"Learn to Love Veggies" Tip
You can leave the garlic unpeeled or peeled for roasting. If you peel them, be sure to have your kids do the job! First they can smash the garlic cloves a bit using the flat end of a butter knife and then they peel it. Peeling garlic is great for fine motor skills and gets that garlic-y flavor on their fingers and aroma in the air, this is a great introduction to garlic for kids!
 Roasted Garlic and Onion Marinara
Yield: 4-6
Prep time: 10 MinCook time: 25 MinTotal time: 35 Min
Made from just 4 ingredients, this pasta sauce is so simple but so delicious! Serve on top of or tossed with whatever kind of pasta your family enjoys. The flavorful tomato sauce is also great for pizza or any other recipe you’d use marinara.
Ingredients
Instructions

Check out our shop for products that teach kids to learn to love veggies! This includes veggie activity boxes, kid-safe knives, interactive placemats, and more.
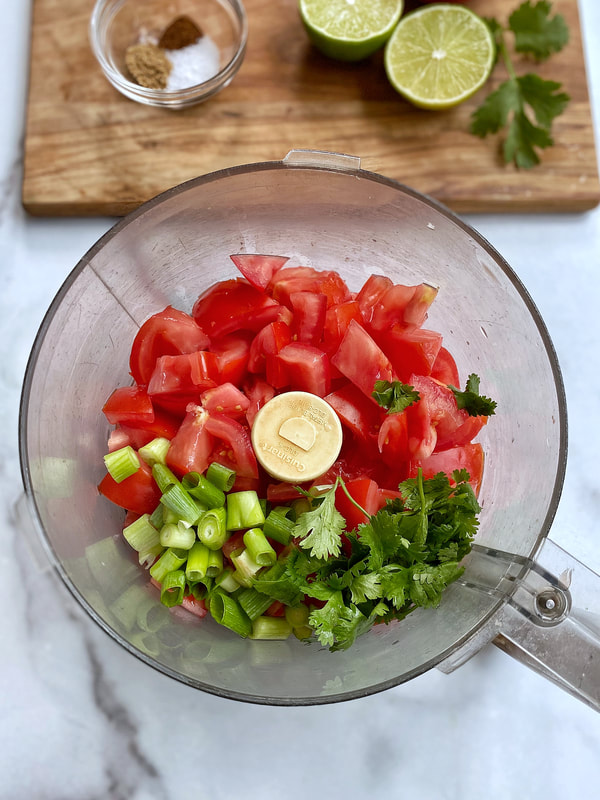
This salsa is made in a food processor, so you don’t have to worry about chopping tomatoes all day. Add a few other ingredients and you’ve got a delicious snack to eat with chips, on tacos, or with a variety of food! Homemade chips are really fun for kids to make at home (recipe below), but you can serve this salsa with store-bought chips as well.
*Please be aware that tortilla chips can be a choking hazard or are hard to chew for toddlers and kids under 4* This recipe was created by Happy Kids Kitchen for Veggie Buds Club. "Learn to Love Veggies" Tip
This salsa tastes fresh and tomato-y, not spicy at all, therefore it is very kid-friendly!
Get your kids in the kitchen: they can help cut the tomatoes into rough chunks, add the ingredients to the food processor, and pulse until everything is roughly chopped.  Fresh Tomato Salsa with Baked Tortilla Chips
Prep time: 5 MinCook time: 10 MinTotal time: 15 Min
This salsa is made in a food processor, so you don’t have to worry about chopping tomatoes all day. Add a few other ingredients and you’ve got a delicious snack to eat with chips, on tacos, or with a variety of food! Homemade chips are really fun for kids to make at home, but you can serve this salsa with store-bought chips as well.
Ingredients
Salsa
Tortilla Chips
Instructions
Check out our shop for products that teach kids to learn to love veggies! This includes veggie activity boxes, kid-safe knives, interactive placemats, and more.
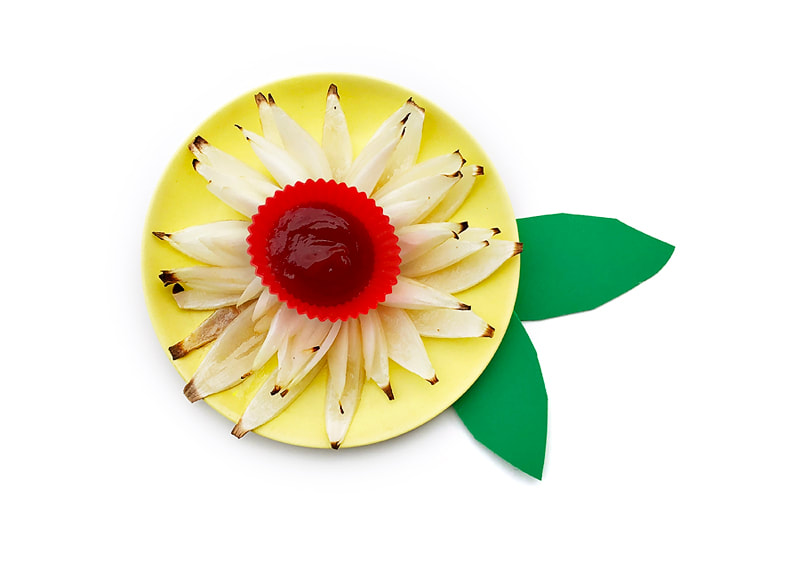
Simply slicing and baking turns this veggie into a beautiful bloom! Kids will love seeing the onion transform in the oven.
This recipe was developed by Eat Pretty Darling for Veggie Buds Club. "Learn to Love Veggies" Tip
Food art is a great "tool" to help kids learn to love veggies! Transforming an onion into a flower and adding a favorite dip makes onions more approachable for picky eaters.
 Onion Flower
Simply slicing and baking turns this veggie into a beautiful bloom! Kids will love seeing the onion transform in the oven.
Ingredients
Instructions
Check out our shop for products that teach kids to learn to love veggies! This includes veggie activity boxes, kid-safe knives, interactive placemats, and more.
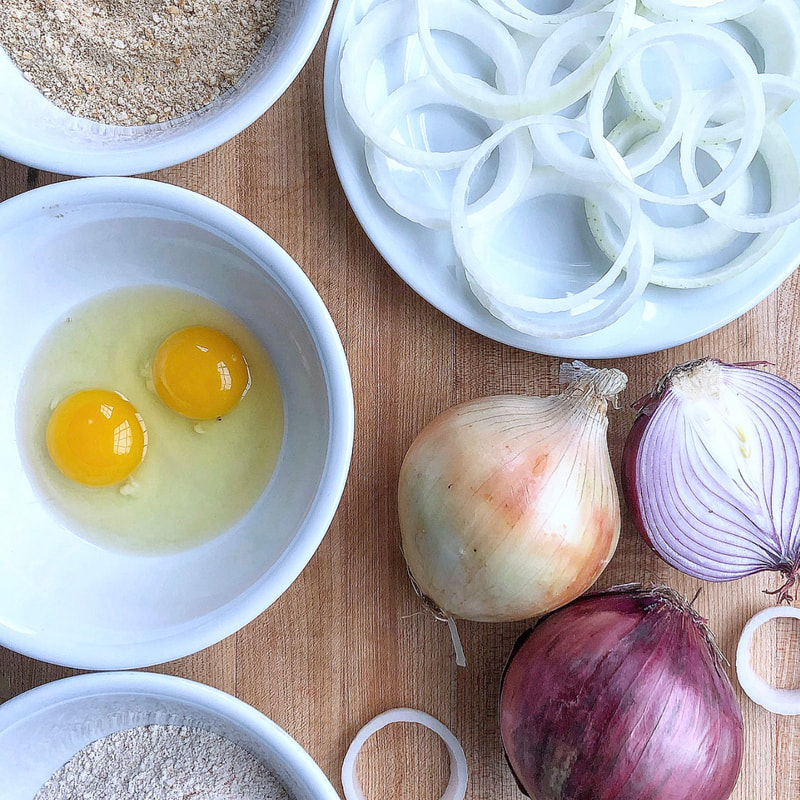
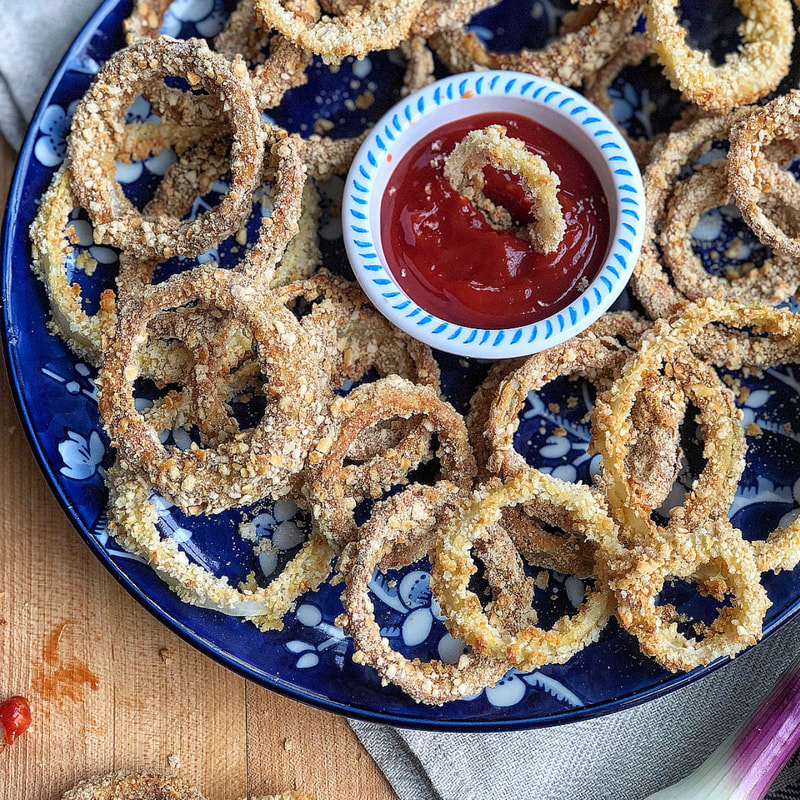
These Crunchy Baked Onion Rings are sure to be a hit with the whole family! Experiment with the kind of breadcrumbs you use or try grinding pretzels or crackers in the food processor to make a crunchy coating for the onion rings. Serve up the baked, crispy rings with ketchup, ranch dressing, or your family's favorite sauce to enjoy as a snack or side dish.
This recipe was developed by Happy Kids Kitchen for Veggie Buds Club. "Learn to Love Veggies" Tip
Onion rings are a great way to make onions more approachable for kids! Get your kids in the kitchen with many steps: they will love to help measure the ingredients, crack the eggs, and set up the breading assembly line. Little fingers might get pretty messy while making this recipe, but the end result is well worth it
 Crunchy Baked Onion Rings
Prep time: 10 MinCook time: 20 MinTotal time: 30 Min
These Crunchy Baked Onion Rings are sure to be a hit with the whole family! Experiment with the kind of breadcrumbs you use or try grinding pretzels or crackers in the food processor to make a crunchy coating for the onion rings. Serve up the baked, crispy rings with ketchup, ranch dressing, or your family's favorite sauce to enjoy as a snack or side dish.
Ingredients
Instructions
Notes:*For egg-free version, use 3 tablespoons of ground flax mixed with 3/4 cup water or 3/4 cup full-fat coconut milk.
Check out our shop for products that teach kids to learn to love veggies! This includes veggie activity boxes, kid-safe knives, interactive placemats, and more.
We are excited to bring you this month's post from Katie Blauser, the creator of Eat Pretty Darling. Each month on our blog we feature a "Color of the Week" that corresponds with Veggie Buds Club's veggie of the month. January's featured veggie is BROCCOLI so of course we're celebrating GREEN veggies! 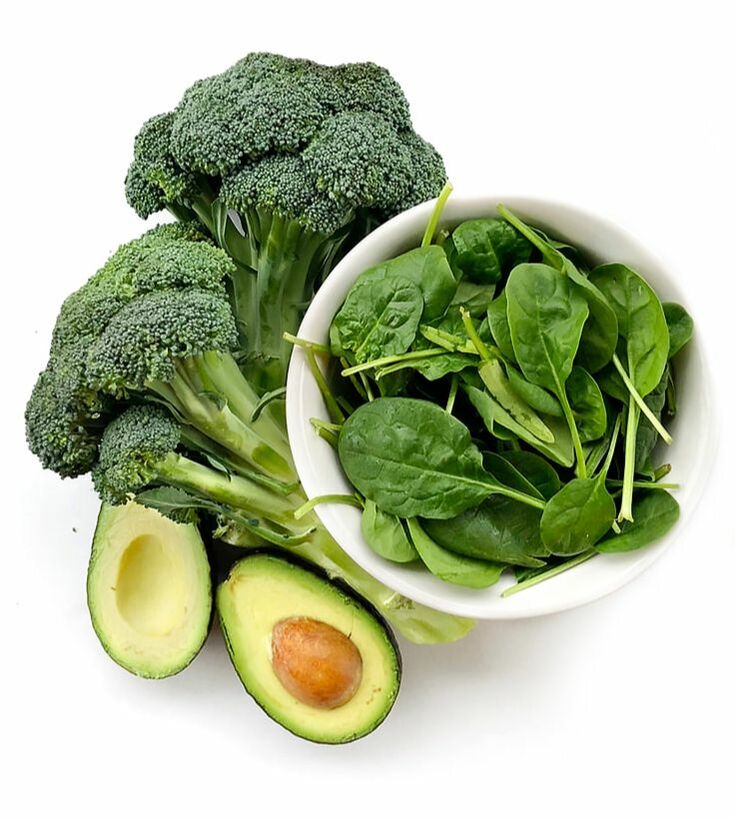 Katie Blauser is the mama of two boys, wife of a picky eater, and food lover at Eat Pretty Darling. She believes in making food fun, healthy, & pretty! Katie’s not only outnumbered by boys in her little family, but also by picky eaters. She loves trying to find new ways to get both kids and adults to eat healthy while making food pretty yummy, pretty healthy, and pretty fun! Find Katie on Instagram (@eatprettydarling), where she shares colorful and cute food ideas for both picky and adventurous eaters. Color of the Week - GreenThis week is as easy one, GREEN! I think green is probably the easiest color to find in the produce section of your grocery store. But unfortunately, it can also be the hardest one to get your little ones to eat. You can find anything from fruit to vegetables, herbs to nuts. Green is such a fun color to take on for #eatprettycoloroftheweek and allows for so many options! We picked out broccoli, spinach, avocado, and green onion and decided to make it into a savory pancake. Pancakes are always a favorite in our house so I thought it would be a great new way to introduce a food we’re still learning to like, broccoli. And what pairs better with broccoli than cheese?! These Broccoli & Cheese Pancakes are great served as pancakes for breakfast, dipped in ketchup as a side to any meal, or eaten just as they are! 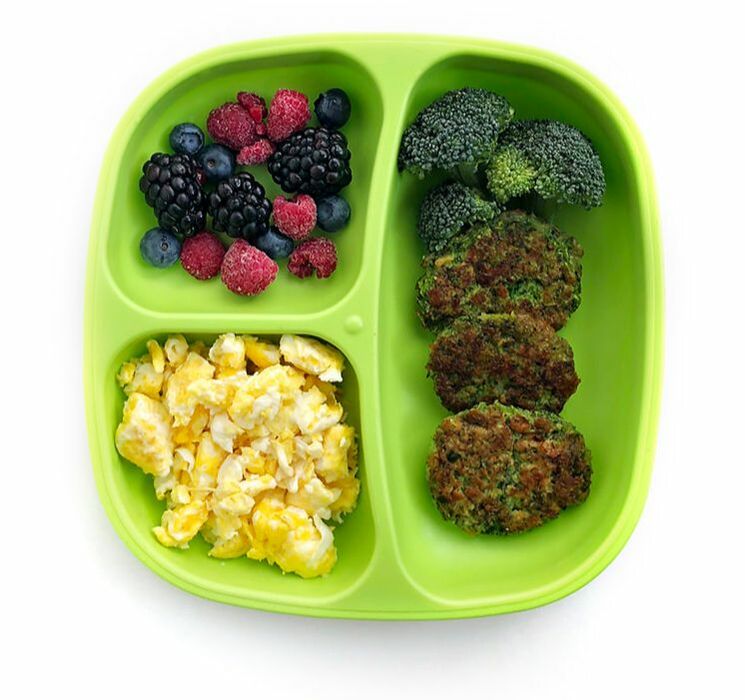 Cheesy Broccoli PancakesIngredients
Green FoodsThere are more out there, but here’s a list to get started!
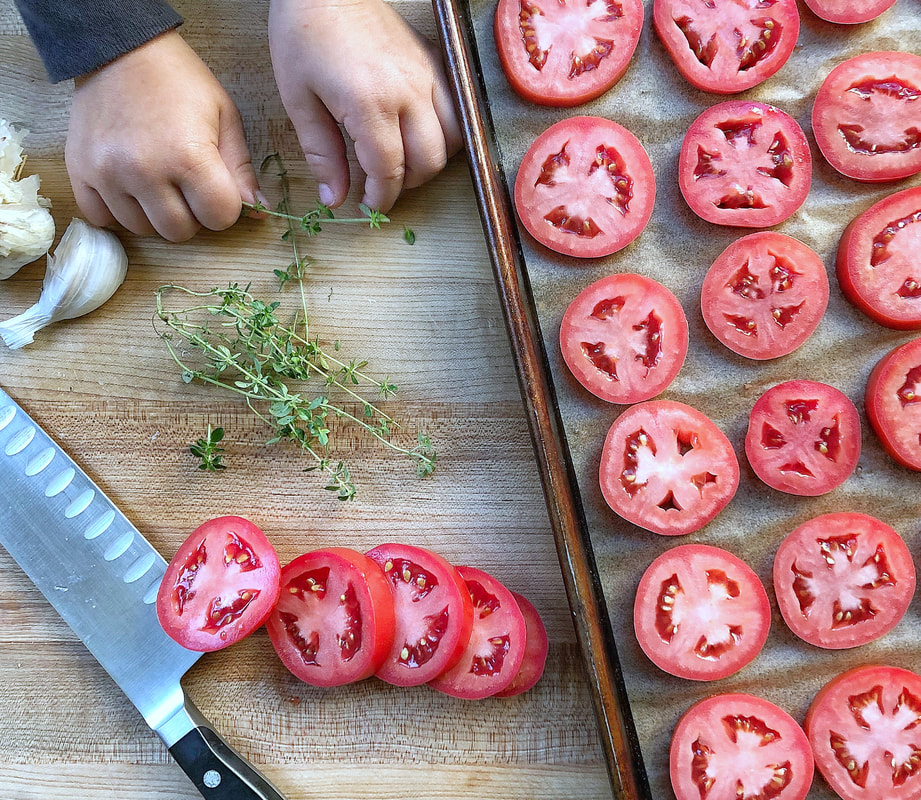
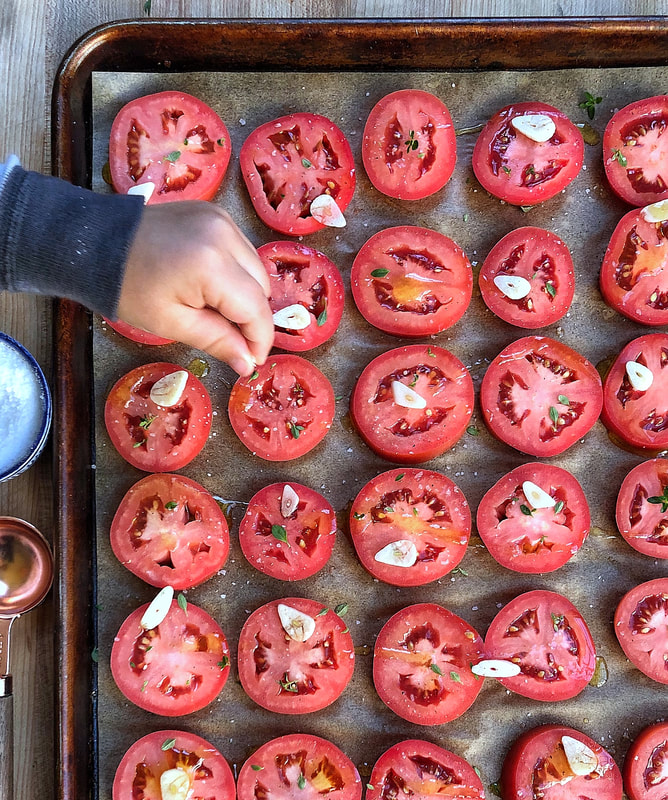
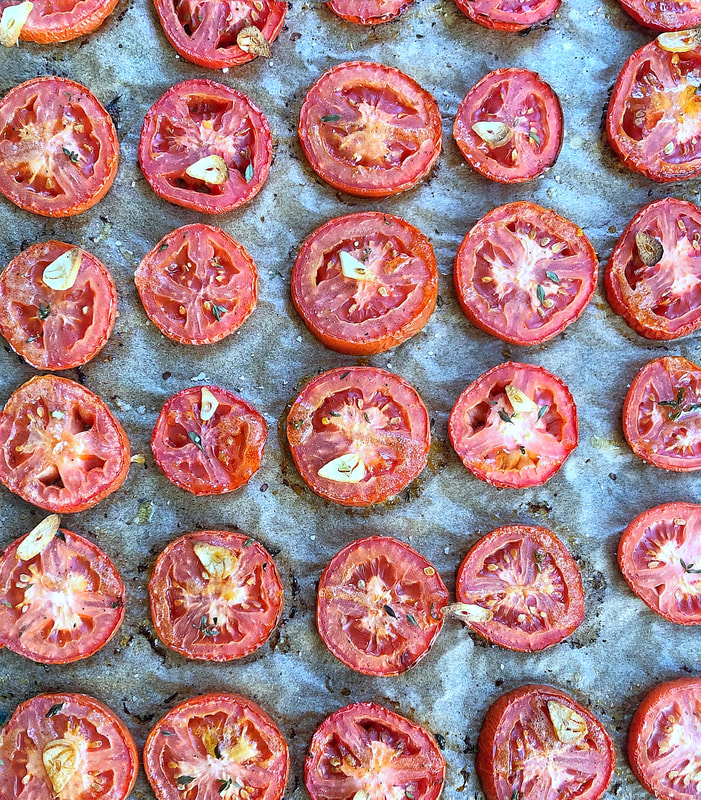
Want your kids to eat more veggies?Check out our shop for interactive and fun products that teach kids that veggies are fun and tasty! In our shop you can find kid-safe knives, interactive placements, veggie-themed activity boxes, and more!   These recipes were developed by Heather Staller, a mom of two boys, ages 5 and 3, and cooking instructor specializing in bringing cooking into preschool classrooms. After college, Heather knew she wanted to be a teacher, but first followed her lifelong dream of going to culinary school. Teaching cooking combines both of her passions, and she truly enjoys introducing young children to the joys of cooking with fresh ingredients. Find Heather on Instagram (@heather.happykidskitchen), where she shares inventive kid-friendly recipes and ideas for cooking with kids at home. Roasted Plum TomatoesRoasting tomatoes concentrates their sweet flavor. Use the finished tomatoes in the ketchup recipe below, or they are great on pizza, in sandwiches, on toast, or in a pasta sauce! Ingredients
Homemade Roasted Tomato KetchupEverything is better from scratch! Making your own ketchup lets you control the sugar content and quality of ingredients, and it tastes great. Homemade ketchup is the perfect kid-friendly condiment! Makes 2 cups Ingredients
|