|
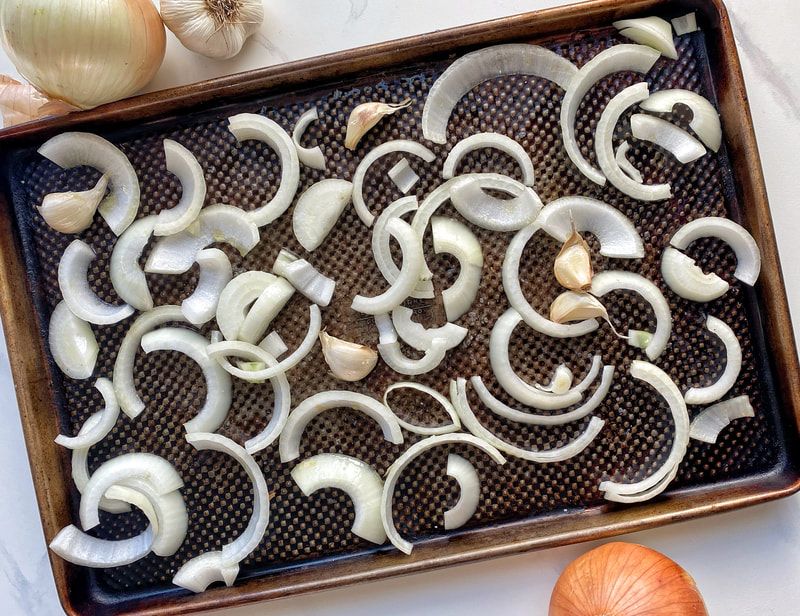
Made from just 4 ingredients, this pasta sauce is so simple but so delicious! Roasted sliced onion and whole cloves of garlic makes them super sweet and cuts out any of the “spicy” or strong flavor kiddos might not enjoy. Little chefs can help toss the onion and garlic in oil and sprinkle on salt before roasting. Then they can help add the can of tomatoes and blend up the sauce. Serve on top of or tossed with whatever kind of pasta your family enjoys. Spaghetti is our favorite. The flavorful tomato sauce is also great for pizza or any other recipe you’d use marinara.
"Learn to Love Veggies" Tip
You can leave the garlic unpeeled or peeled for roasting. If you peel them, be sure to have your kids do the job! First they can smash the garlic cloves a bit using the flat end of a butter knife and then they peel it. Peeling garlic is great for fine motor skills and gets that garlic-y flavor on their fingers and aroma in the air, this is a great introduction to garlic for kids!
 Roasted Garlic and Onion Marinara
Yield: 4-6
Prep time: 10 MinCook time: 25 MinTotal time: 35 Min
Made from just 4 ingredients, this pasta sauce is so simple but so delicious! Serve on top of or tossed with whatever kind of pasta your family enjoys. The flavorful tomato sauce is also great for pizza or any other recipe you’d use marinara.
Ingredients
Instructions

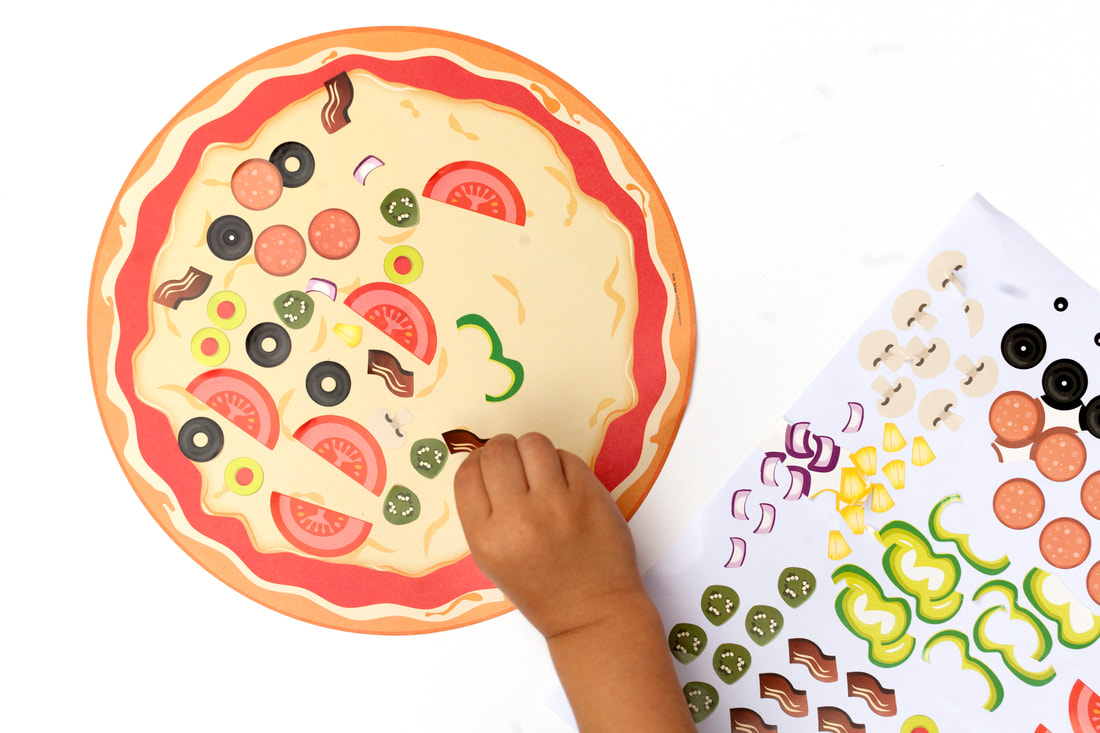
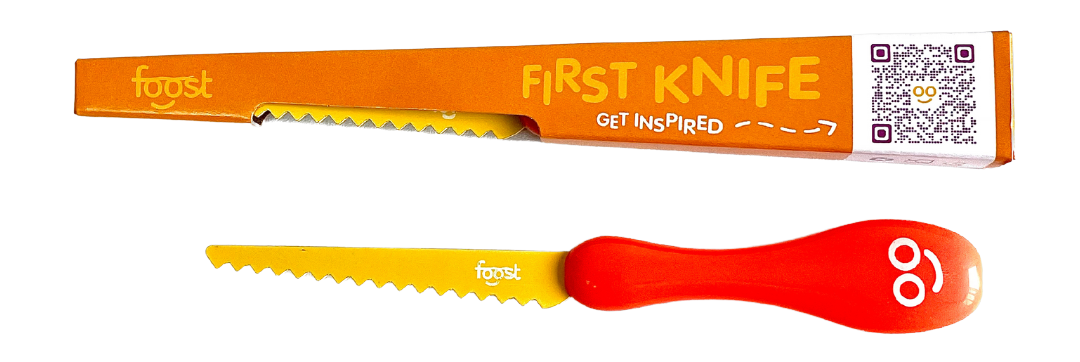
Check out our shop for products that teach kids to learn to love veggies! This includes veggie activity boxes, kid-safe knives, interactive placemats, and more.
0 Comments
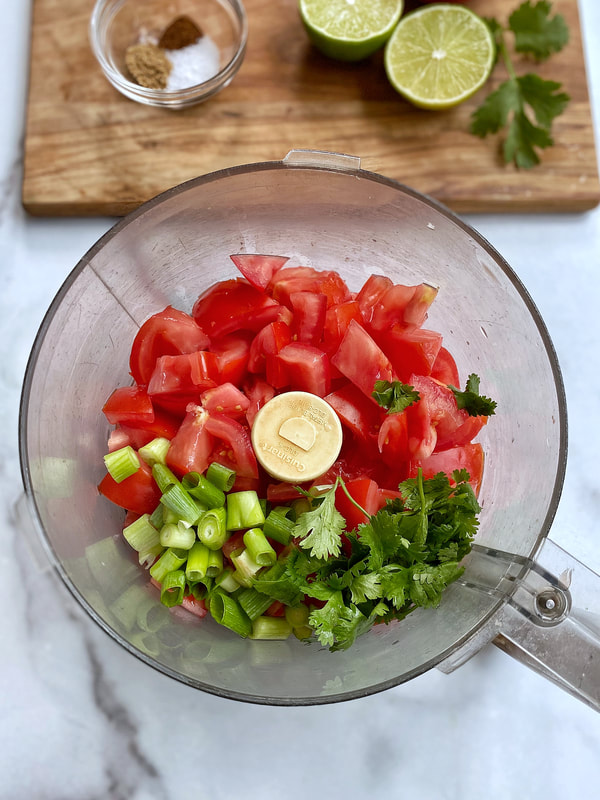
This salsa is made in a food processor, so you don’t have to worry about chopping tomatoes all day. Add a few other ingredients and you’ve got a delicious snack to eat with chips, on tacos, or with a variety of food! Homemade chips are really fun for kids to make at home (recipe below), but you can serve this salsa with store-bought chips as well.
*Please be aware that tortilla chips can be a choking hazard or are hard to chew for toddlers and kids under 4* This recipe was created by Happy Kids Kitchen for Veggie Buds Club. "Learn to Love Veggies" Tip
This salsa tastes fresh and tomato-y, not spicy at all, therefore it is very kid-friendly!
Get your kids in the kitchen: they can help cut the tomatoes into rough chunks, add the ingredients to the food processor, and pulse until everything is roughly chopped.  Fresh Tomato Salsa with Baked Tortilla Chips
Prep time: 5 MinCook time: 10 MinTotal time: 15 Min
This salsa is made in a food processor, so you don’t have to worry about chopping tomatoes all day. Add a few other ingredients and you’ve got a delicious snack to eat with chips, on tacos, or with a variety of food! Homemade chips are really fun for kids to make at home, but you can serve this salsa with store-bought chips as well.
Ingredients
Salsa
Tortilla Chips
Instructions
Check out our shop for products that teach kids to learn to love veggies! This includes veggie activity boxes, kid-safe knives, interactive placemats, and more.
This rice dish that tastes just like pizza, a kid favorite! Your child can help chop the tomatoes and mash and stir them over the stove (if you're comfortable with this step). Finally, they can top the tomato-rice mixture with shredded cheese and then enjoy the final tasty dish!
"Learn to Love Veggies" Tip
Here is a great opportunity to talk with your child about all of the great condiments that tomatoes can be found in such as ketchup, pasta sauce, and pizza sauce! Having them help out with this recipe will make it so that they are more likely to try it and not be alarmed that tomatoes, a.k.a the "pizza sauce veggie", are in this dish.
 Pizza Rice
Yield: 4-6
This rice dish that tastes just like pizza, a kid favorite!
Ingredients
Instructions
Check out our shop for products that teach kids to learn to love veggies! This includes veggie activity boxes, kid-safe knives, interactive placemats, and more!
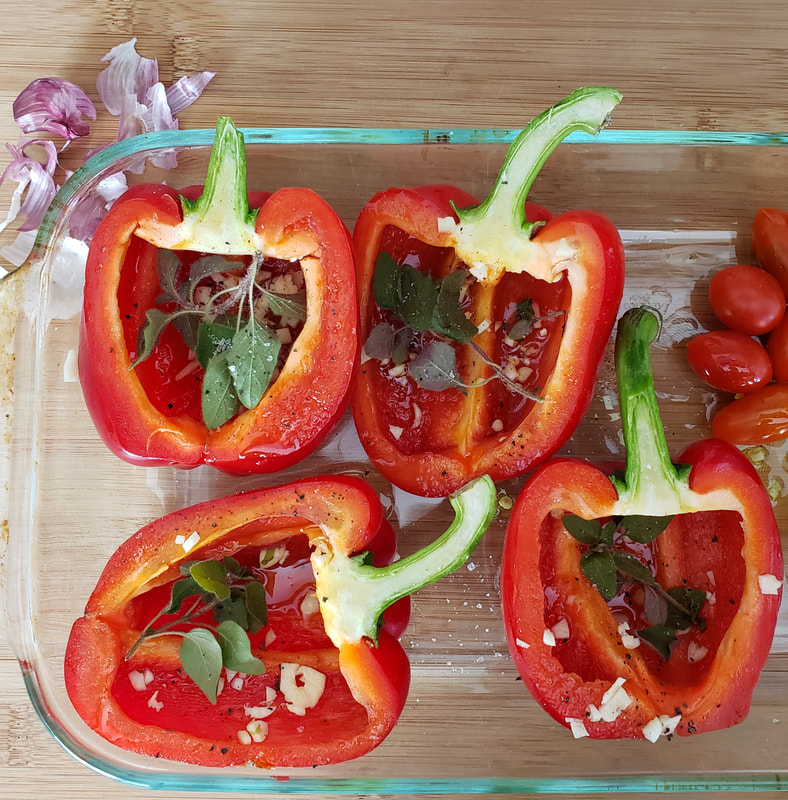
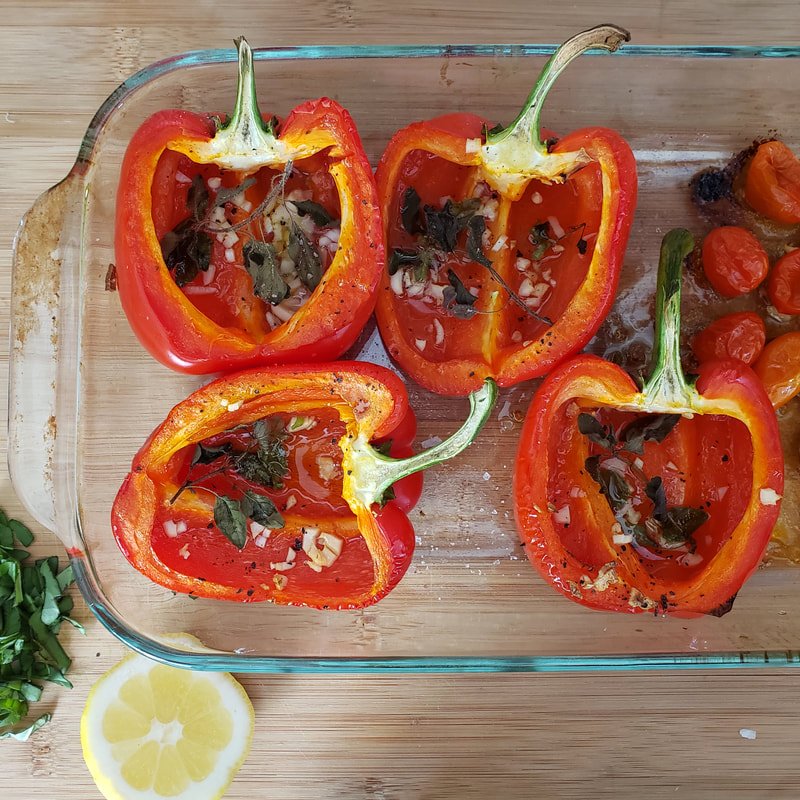
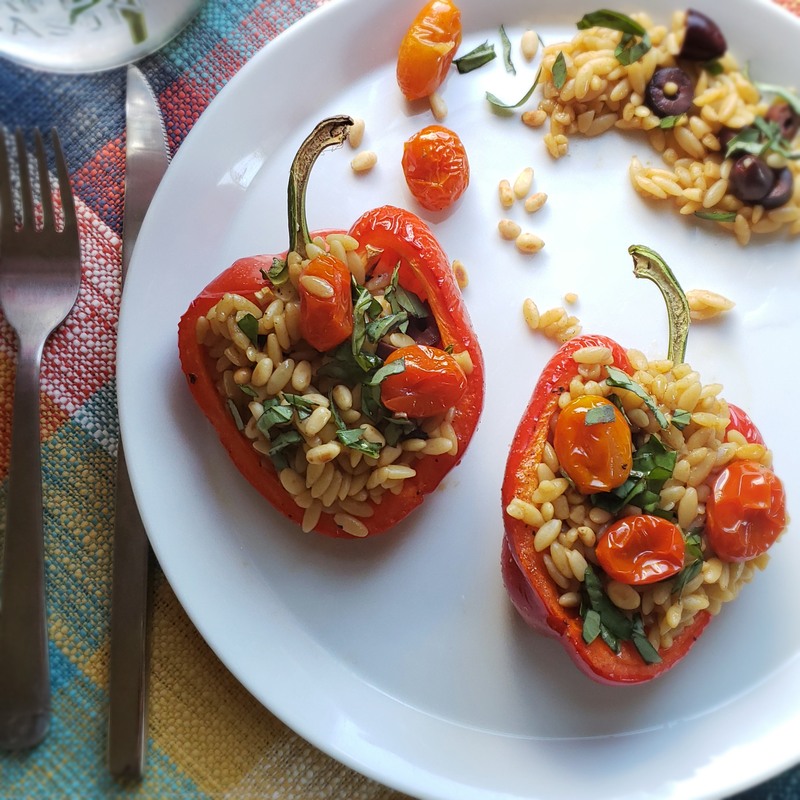
These stuffed roasted red peppers are absolutely divine! They are bursting with flavor and yet totally kid-friendly.
"Learn to Love Veggies" Tip
If you think your child will find this dish to be too flavorful, you can simply adjust their servings: examples include omitting the garlic and oregano in the roasting process and omitting the Kalamata olives. Simple roasted red peppers stuffed with orzo pasta and topped with fresh basil is a totally tasty kid meal (and you can still add all of those extra flavors and toppings to the adult servings, yum!).
 Orzo Stuffed Roasted Red Peppers
Yield: 4
Prep time: 10 MinCook time: 30 MinTotal time: 40 Min
These stuffed roasted red peppers are absolutely divine! They are bursting with flavor and yet totally kid-friendly. See notes below on how to meal prep to make this a quick weeknight meal!
Ingredients
Roasted red peppers and cherry tomatoes
Orzo pasta
Instructions
Notes:To Prep Ahead for a Quick Weeknight Meal
Check out our shop for products that teach kids to learn to love veggies! This includes veggie activity boxes, kid-safe knives, interactive placemats, and more.
We are excited to bring you this month's post from Katie Blauser, the creator of Eat Pretty Darling. Each month on our blog we feature a "Color of the Week" that corresponds with Veggie Buds Club's veggie of the month. November's veggie is KALE, and we're having fun this month by celebrating RAINBOW veggies and a RAINBOW KALE kid-friendly recipe! 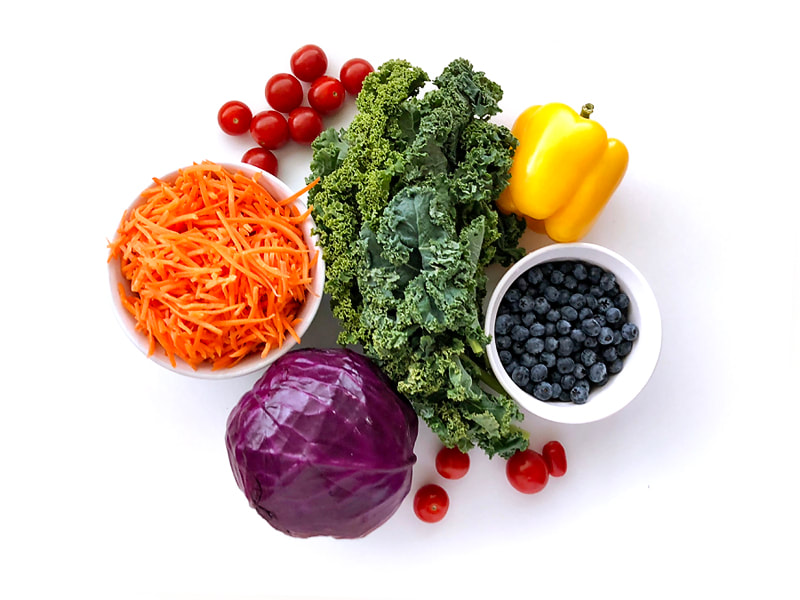 Katie Blauser is the mama of two boys, wife of a picky eater, and food lover at Eat Pretty Darling. She believes in making food fun, healthy, & pretty! Katie’s not only outnumbered by boys in her little family, but also by picky eaters. She loves trying to find new ways to get both kids and adults to eat healthy while making food pretty yummy, pretty healthy, and pretty fun! Find Katie on Instagram (@eatprettydarling), where she shares colorful and cute food ideas for both picky and adventurous eaters. Color of the Week - RainbowSome weeks we like to have a little fun and instead of picking a color, we pick all of the colors! Rainbow is a color in our book. We grabbed one item in each color to go with our green kale in this month’s Veggie Buds Club box. My son picked some of his favorites for each color. Blueberries for blue, carrots for orange, yellow bell pepper for yellow, tomatoes for red, and purple cabbage for purple. Salads may not be the first thing that comes to mind when thinking of kid food, but making it full of color and having them help pick the ingredients makes it a little more exciting. The fun thing about this recipe is you could use almost any fruits or veggies that fit the colors, as long as you try to make a rainbow! Have your kids be a part of it from start to finish. 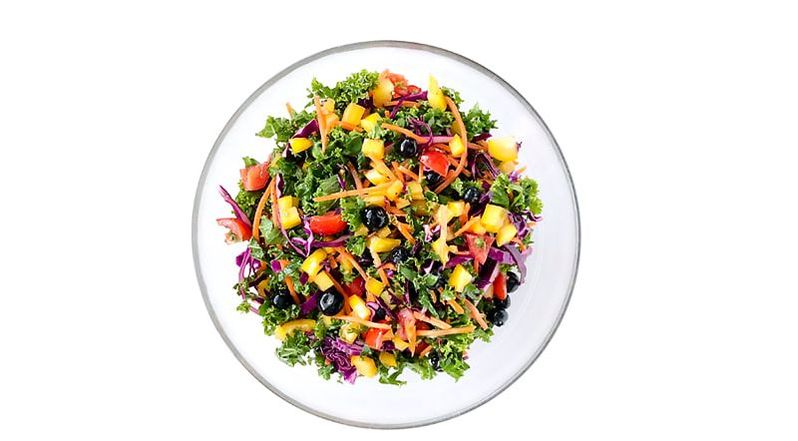 Rainbow Kale SaladIngredients
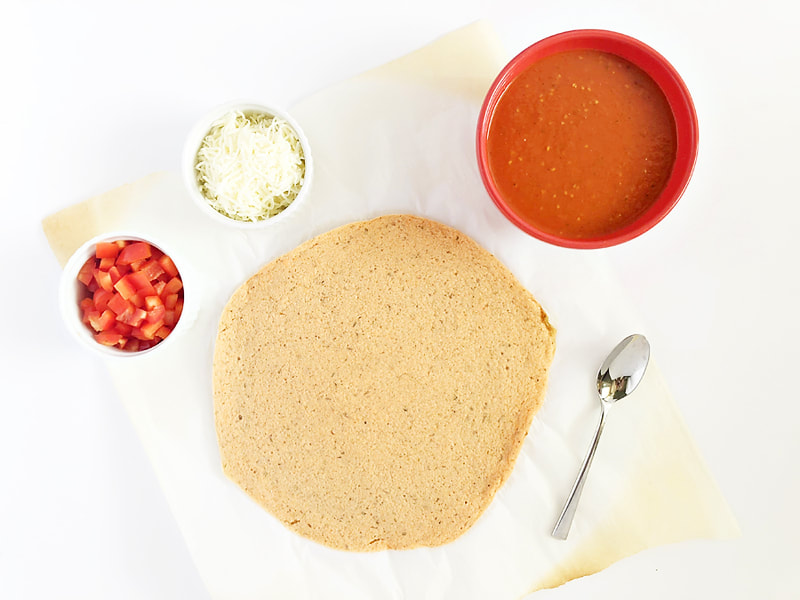
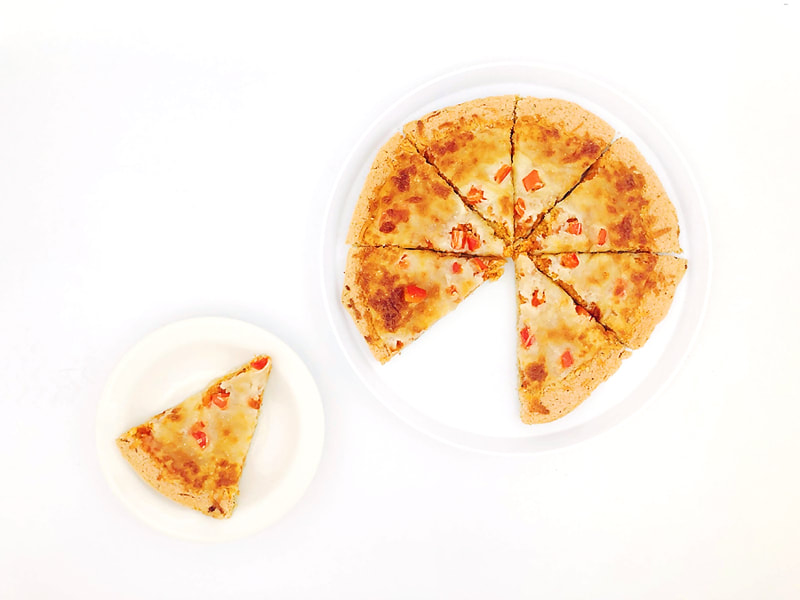
Want your kids to eat more veggies?Check out our shop for interactive and fun products that teach kids that veggies are fun and tasty! In our shop you can find kid-safe knives, interactive placements, veggie-themed activity boxes, and more!  We are excited to bring you this month's post from Katie Blauser, the creator of Eat Pretty Darling. Each month on our blog we feature a "Color of the Week" that corresponds with Veggie Buds Club's veggie of the month. August's veggie is TOMATO so we're focusing on RED veggies this month! 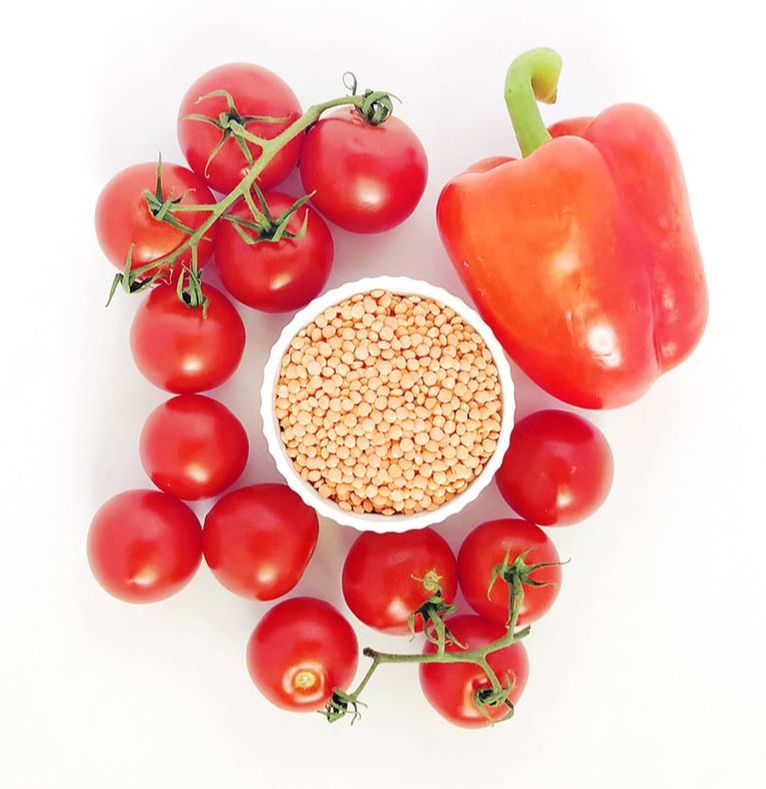 Katie Blauser is the mama of two boys, wife of a picky eater, and food lover at Eat Pretty Darling. She believes in making food fun, healthy, & pretty! Katie’s not only outnumbered by boys in her little family, but also by picky eaters. She loves trying to find new ways to get both kids and adults to eat healthy while making food pretty yummy, pretty healthy, and pretty fun! Find Katie on Instagram (@eatprettydarling), where she shares colorful and cute food ideas for both picky and adventurous eaters. Color of the Week - REDIt’s time to find all things RED this week to go along with our yummy veggie (technically a fruit!) of the month, tomatoes. You could literally just stick to the tomato section this week and just get different varieties of tomatoes because there are so many! Are your kids like mine and they love everything made from tomatoes, just not an actual tomato? This is a great time to make some of their favorites like ketchup and red sauce to show them that some of the things they love are made with this pretty red fruit. And calling it a fruit is such a selling point for my picky eater! This week we ventured out of the produce department and snagged some red lentils. While there are tons of great fresh food options for the color red, there are so many others throughout the store! Just make sure to stick with items that are just the ingredient. This week, we’re making a crowd pleasing PIZZA!!! It’s allergy friendly because there are no grains, no nuts, and no eggs! Can you guess what makes our pizza crust red?  Really RED PizzaIngredients Pizza Sauce
Have them peel the tomatoes after they are tossed in the ice bath. Ask them help sprinkle on the pizza toppings and cheese! Red Food IdeasThere are more out there, but here’s a list to get started!
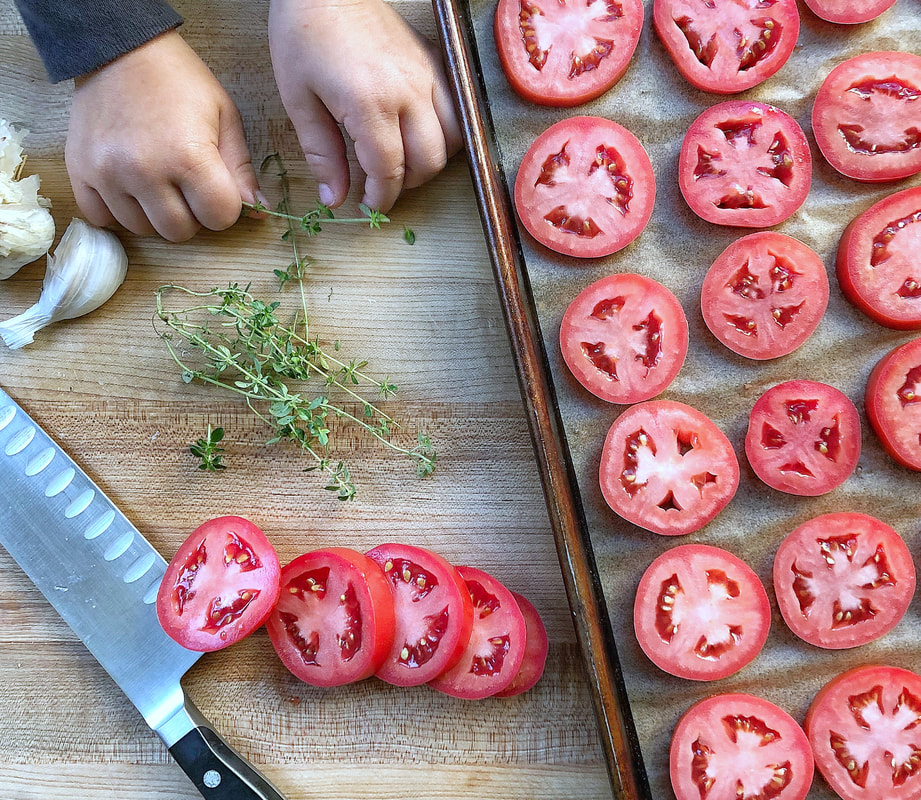
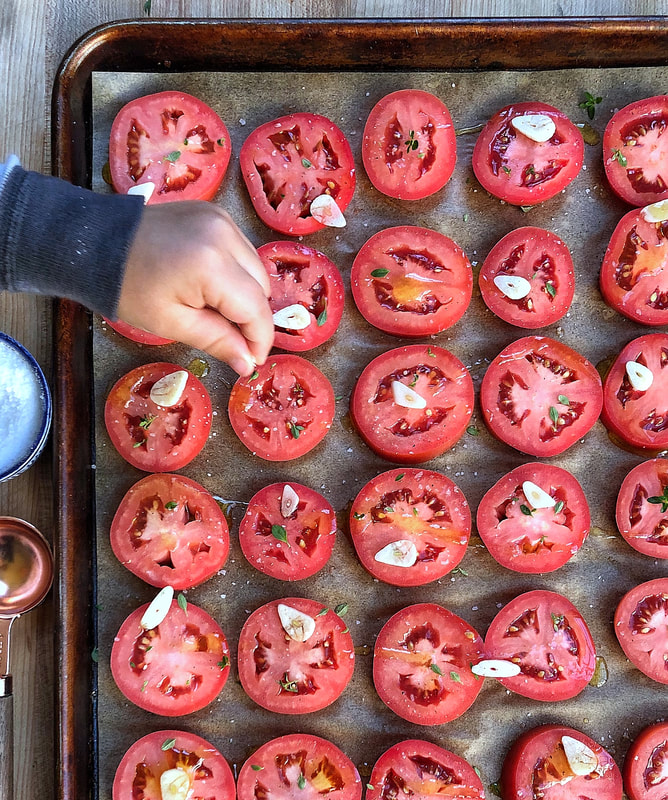
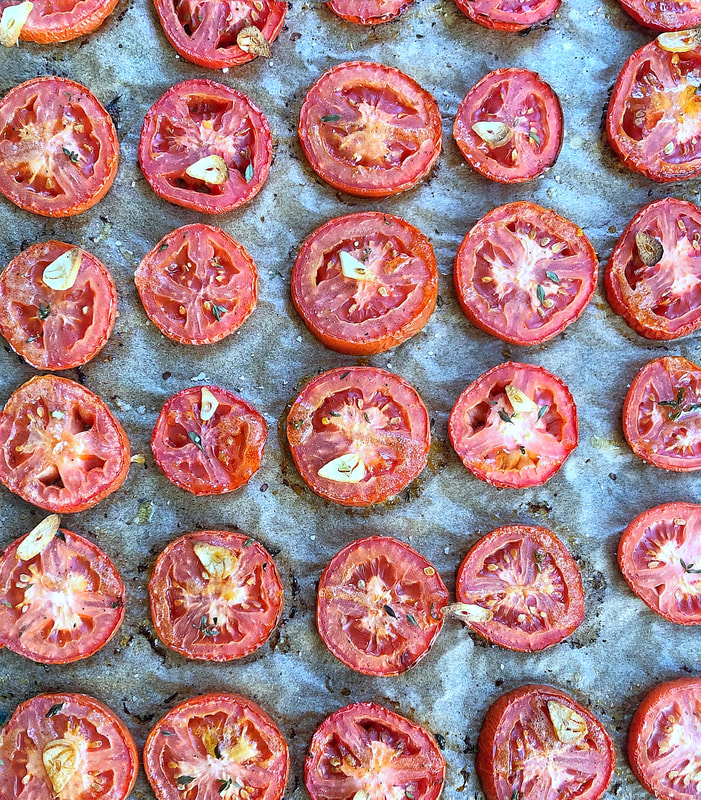
Want your kids to eat more veggies?Check out our shop for interactive and fun products that teach kids that veggies are fun and tasty! In our shop you can find kid-safe knives, interactive placements, veggie-themed activity boxes, and more!  These recipes were developed by Heather Staller, a mom of two boys, ages 5 and 3, and cooking instructor specializing in bringing cooking into preschool classrooms. After college, Heather knew she wanted to be a teacher, but first followed her lifelong dream of going to culinary school. Teaching cooking combines both of her passions, and she truly enjoys introducing young children to the joys of cooking with fresh ingredients. Find Heather on Instagram (@heather.happykidskitchen), where she shares inventive kid-friendly recipes and ideas for cooking with kids at home. Roasted Plum TomatoesRoasting tomatoes concentrates their sweet flavor. Use the finished tomatoes in the ketchup recipe below, or they are great on pizza, in sandwiches, on toast, or in a pasta sauce! Ingredients
Homemade Roasted Tomato KetchupEverything is better from scratch! Making your own ketchup lets you control the sugar content and quality of ingredients, and it tastes great. Homemade ketchup is the perfect kid-friendly condiment! Makes 2 cups Ingredients
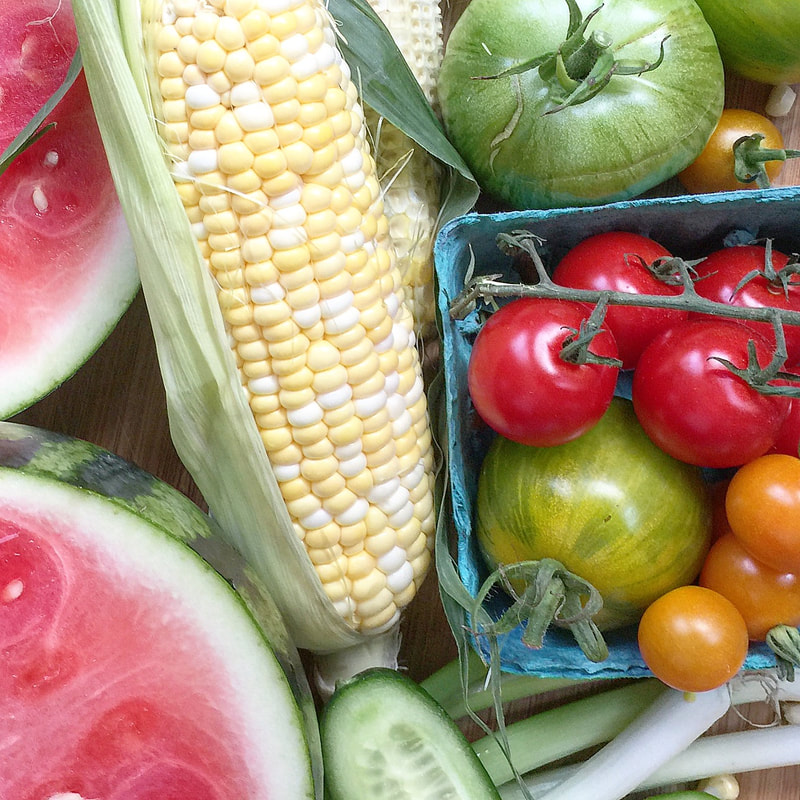
If you asked me to list off 5 foods that ideally everyone would eat every day tomatoes would be on that list! They are packed with incredible nutrition such as vitamin C which supports our immune system and increases iron absorption as well as lycopene, an antioxidant that helps reduce the risk of cancer. You can imagine my excitement when I learned that August is TOMATO month at Veggie Buds Club! I hope this month your little ones enjoy trying tomatoes in all sorts of ways including the fun and easy bruschetta recipes below! All three recipes only have 3 ingredients so getting your children involved will be super easy! Peach BruschettaMix together 1 diced peach, 8-10 diced cherry tomatoes, and 1-2 tablespoons of hemp hearts. Add to your favorite whole grain crusty bread and serve! 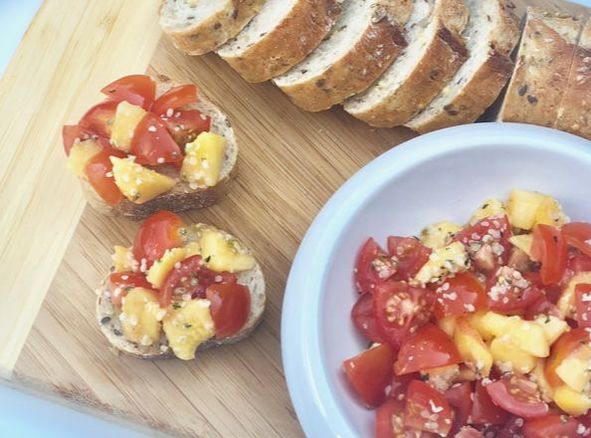 Feta BruschettaMix together 1 cup of Tomberries, 10 pieces of thinly cut baby spinach, and 1/2 cup crumbled feta cheese. Add to your favorite whole grain crusty bread and serve!  Cucumber BruschettaGrate one large tomato and spread onto your favorite whole grain crusty bread. Add a slice of cucumber and a sprinkle of shredded or grated Parmesan cheese and serve! 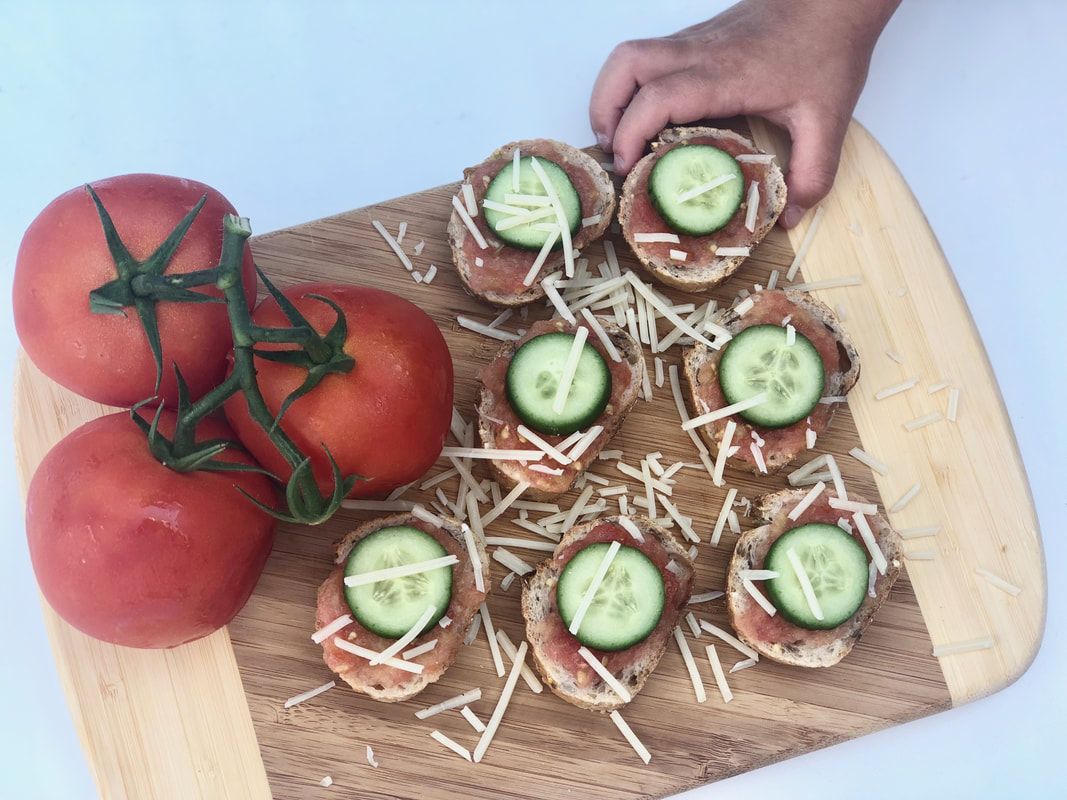 These recipes were developed by Noelle Martin, a Registered Dietitian and mom of three young boys. She has a passion for education, inspiring, and empowering moms to make healthy choices for themselves and their families. Noelle loves involving her children in food planning and preparation for their home and sees the kitchen as a perfect area for teaching both academic and life skills. Follow @MotherhoodandMeals on Instagram for Noelle's nutrition tips, recipes, product reviews, and motherhood moments.
Scoop up this fresh salsa with your favorite chips, serve on top of simply cooked chicken or fish, or pile on top of a green salad. Feel free to add whatever produce you have on hand: fresh herbs like cilantro or basil would be delicious. Bell or spicy peppers would also be a great addition. Click here for our Simple Roasted Corn recipe or substitute canned sweet corn in this recipe instead.
This recipe was developed by Happy Kids Kitchen for Veggie Buds Club. "Learn to Love Veggies" Tip
Watermelon is a great fruit for children to practice their knife skills on because it's very "soft". Have them dice the watermelon using a kid-safe knife or butter knife then mix all of the other ingredients together for this sweet and savory dip.
 Roasted Corn and Watermelon Salsa
Scoop up this fresh salsa with your favorite chips, serve on top of simply cooked chicken or fish, or pile on top of a green salad. Feel free to add whatever produce you have on hand: fresh herbs like cilantro or basil would be delicious. Bell or spicy peppers would also be a great addition.
Ingredients
Instructions
Check out our shop for products that teach kids to learn to love veggies! This includes veggie activity boxes, kid-safe knives, interactive placemats, and more.
|