|
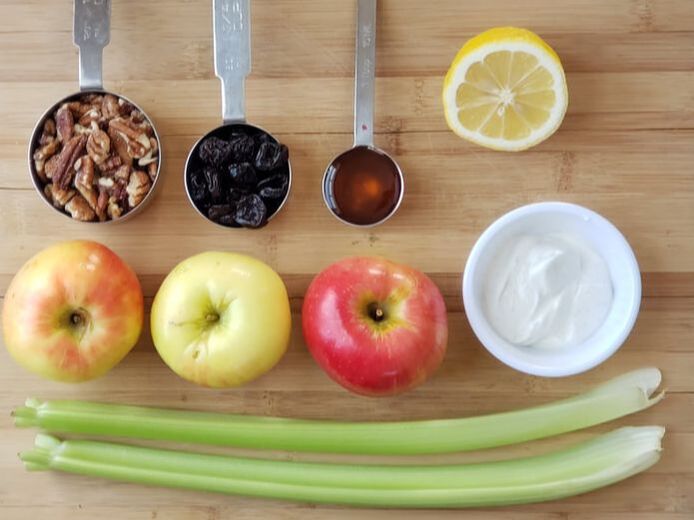
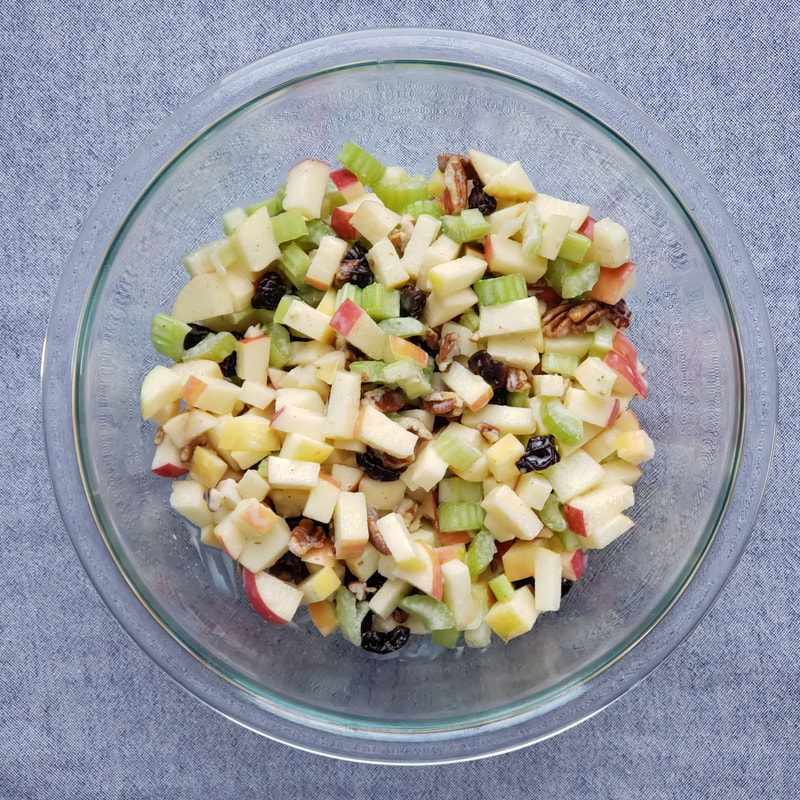
Enjoy this crunchy and sweet Waldorf Salad that's on the lighter side because of the creamy yogurt dressing!
"Learn to Love Veggies" Tip
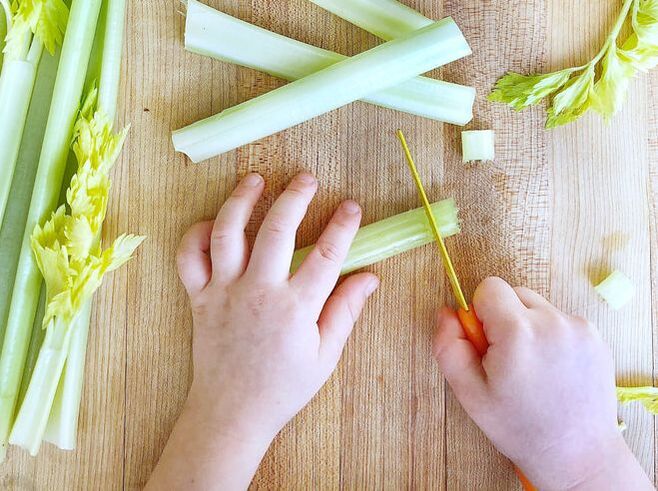
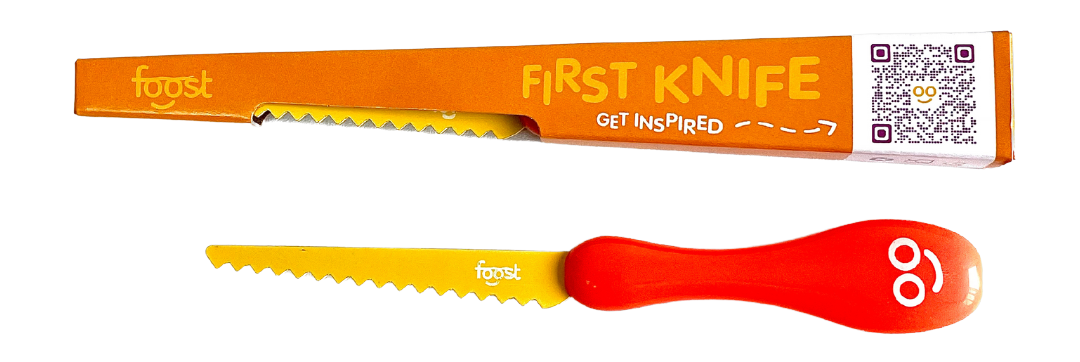
This recipe is a great introduction to celery and salad for children if they're apprehensive about both. Be sure to have them assist you with chopping the celery and apples using a kid-safe knife or butter knife and have them mix up the sweet dressing!
 Waldorf Salad with Yogurt Dressing
Prep time: 5 MinCook time: 5 MinTotal time: 10 Min
Enjoy this crunchy and sweet Waldorf Salad that's on the lighter side because of the creamy yogurt dressing!
Ingredients
Instructions
Check out our shop for products that teach kids to learn to love veggies! This includes veggie activity boxes, kid-safe knives, interactive placemats, and more.
0 Comments
Applesauce is a family favorite in our house and making it homemade makes it even better. The sweetness of the apples helps balance out the earthiness of the beet in this recipe... and the beet turns it such a beautiful color!
This recipe was developed by Eat Pretty Darling for Veggie Buds Club. "Learn to Love Veggies" Tip
As the saying goes, "we eat with our eyes" so making applesauce a beautiful shade of pink is sure to get your kiddos interested in trying this veggie-packed applesauce!
 Beet Applesauce
Prep time: 5 MinCook time: 30 MinTotal time: 35 Min
The sweetness of the apples helps balance out the earthiness of the beet in this recipe... and the beet turns it such a beautiful color!
Ingredients
Instructions
Check out our shop for products that teach kids to learn to love veggies! This includes veggie activity boxes, kid-safe knives, interactive placemats, and more.
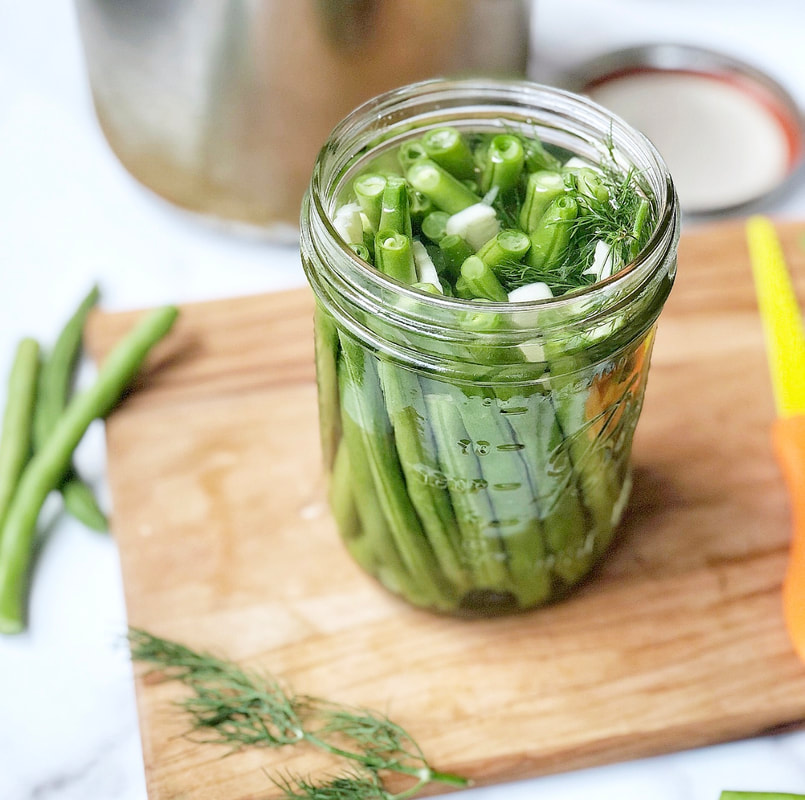
Have you ever made your own pickles? A quick “refrigerator” pickle is so much easier than it sounds and no messing around with sterilizing or canning equipment. Just 6 simple ingredients, a night in the fridge, and you’ve got a yummy side dish or snack!
This recipe was developed by Happy Kids Kitchen for Veggie Buds Club. "Learn to Love Veggies" Tip
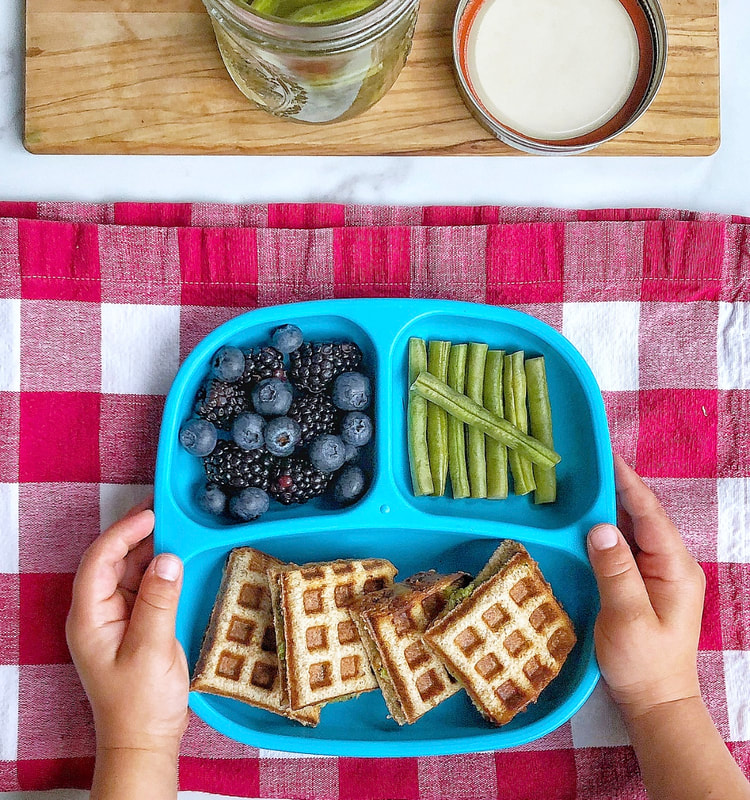
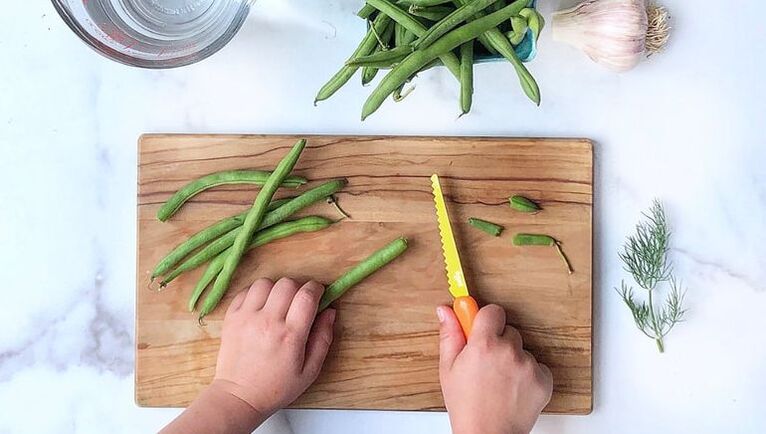
Be sure to get the kids into the kitchen to help prep the green beans! They can either use a child-safe knife to trim the ends off the beans or snap them with their fingers. Measure and mix the ingredients for the brine together then pour it into your jar. The hardest part is waiting a little while to give the crunchy, tangy beans a try, but I promise it will be worth it!
 Dilly Beans
Yield: 1 pint jar
A quick “refrigerator” pickle is so much easier than it sounds and no messing around with sterilizing or canning equipment. Just 6 simple ingredients, a night in the fridge, and you’ve got a yummy side dish or snack!
Ingredients
Instructions
Check out our shop for products that teach kids to learn to love veggies! This includes veggie activity boxes, kid-safe knives, interactive placemats, and more.
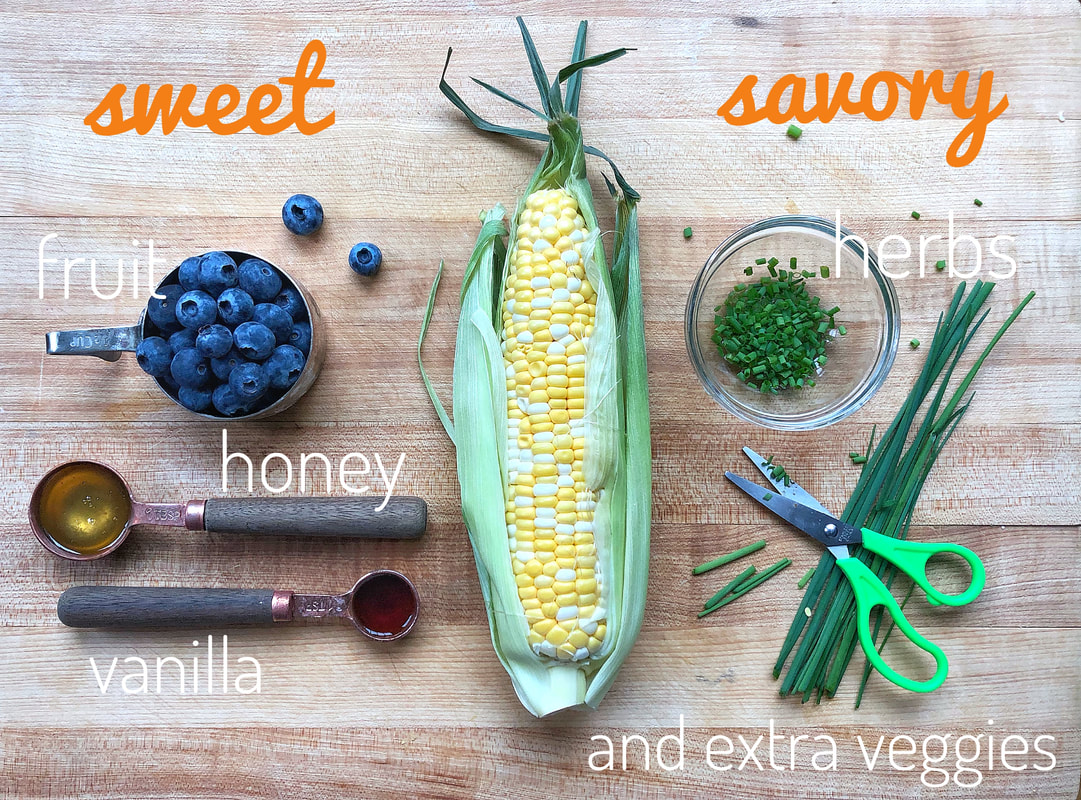
Are you on Team Sweet or Team Savory?!
Take pancakes beyond breakfast and serve them as a snack or a side dish at lunch or dinner. You can mix up the base pancake batter and really add in anything you'd like. For the sweet pancakes, add in fruit, like blueberries or diced strawberries. For a savory pancake, keep the batter as written or add soft herbs like chives or chopped cilantro. You could even add in extra veggies like shredded zucchini or diced bell peppers. Serve sweet pancakes as is or with a drizzle of maple syrup or honey. The savory pancakes are great with avocado or spread with a little cream cheese and made into sandwiches. Try both recipes and come tell us whether you are on team sweet or on team savory! "Learn to Love Veggies" Tip
Fresh corn is so versatile so be sure to have your children try it in a variety of ways! It is delicious in cornbread, corn muffins, corn soups, and corn salads, so why not make a kid favorite, pancakes, and try them out in both sweet and savory ways?!
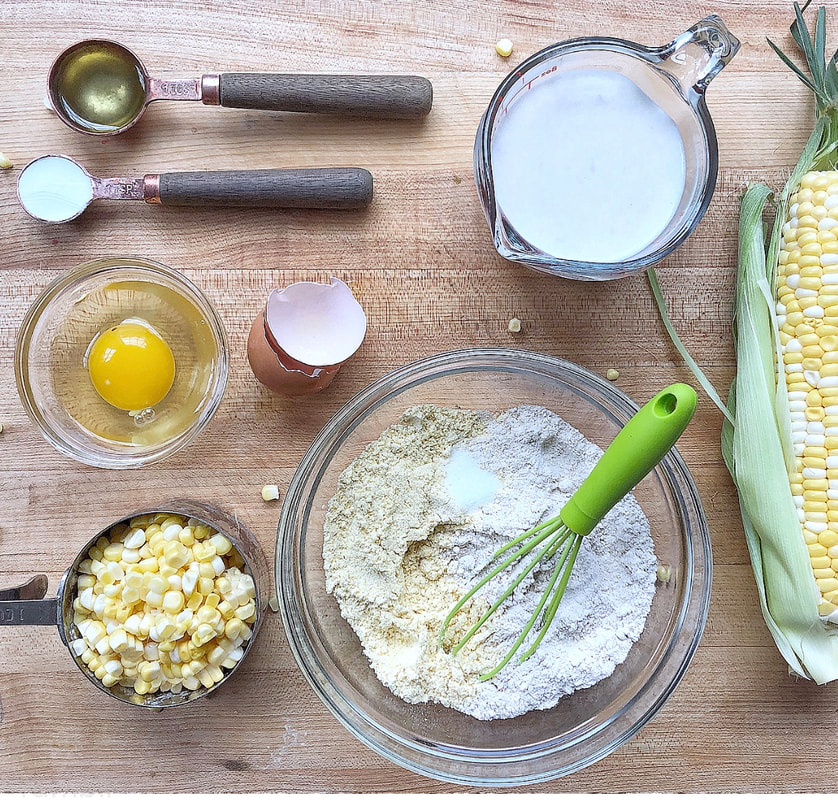
 Sweet or Savory Corn Pancakes
Are you on Team Sweet or Team Savory?! Take pancakes beyond breakfast and serve them as a snack or a side dish at lunch or dinner.
Ingredients
Corn Pancakes
Sweet
Savory (optional)
Instructions

Check out our shop for products that teach kids to learn to love veggies! This includes veggie activity boxes, kid-safe knives, interactive placemats, and more.
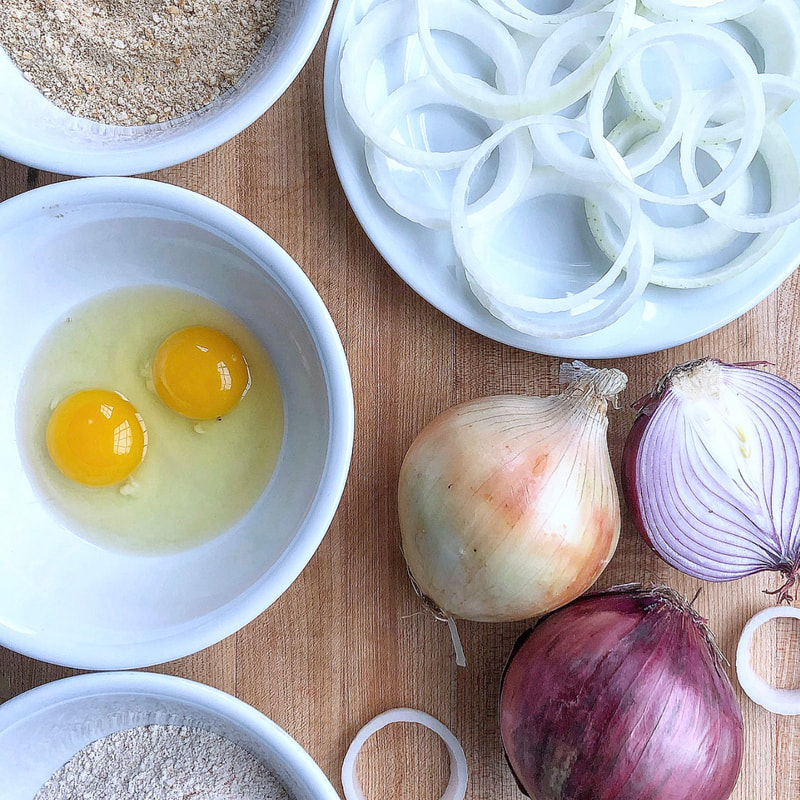
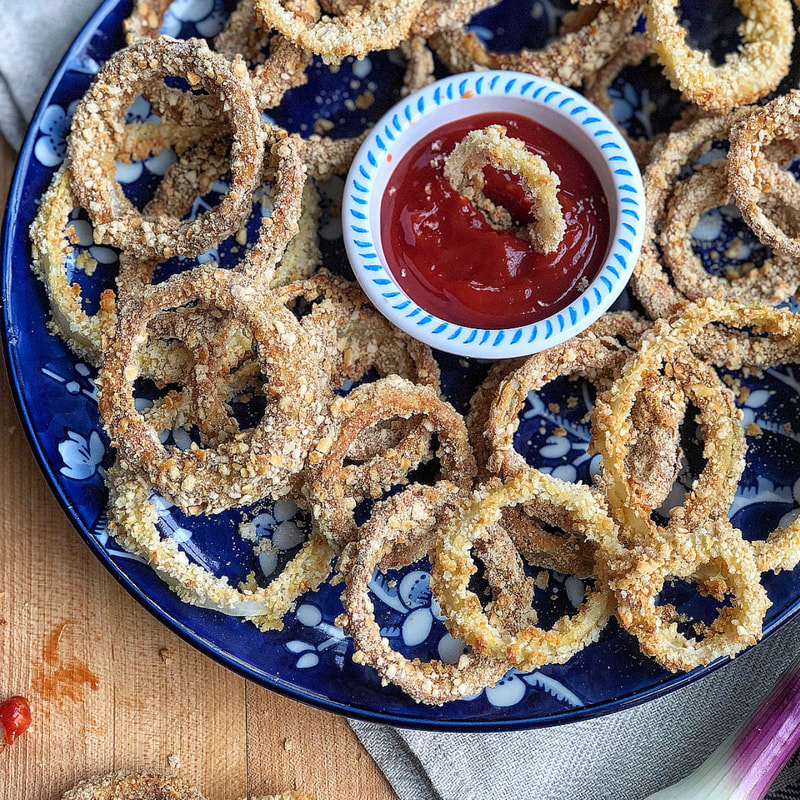
These Crunchy Baked Onion Rings are sure to be a hit with the whole family! Experiment with the kind of breadcrumbs you use or try grinding pretzels or crackers in the food processor to make a crunchy coating for the onion rings. Serve up the baked, crispy rings with ketchup, ranch dressing, or your family's favorite sauce to enjoy as a snack or side dish.
This recipe was developed by Happy Kids Kitchen for Veggie Buds Club. "Learn to Love Veggies" Tip
Onion rings are a great way to make onions more approachable for kids! Get your kids in the kitchen with many steps: they will love to help measure the ingredients, crack the eggs, and set up the breading assembly line. Little fingers might get pretty messy while making this recipe, but the end result is well worth it
 Crunchy Baked Onion Rings
Prep time: 10 MinCook time: 20 MinTotal time: 30 Min
These Crunchy Baked Onion Rings are sure to be a hit with the whole family! Experiment with the kind of breadcrumbs you use or try grinding pretzels or crackers in the food processor to make a crunchy coating for the onion rings. Serve up the baked, crispy rings with ketchup, ranch dressing, or your family's favorite sauce to enjoy as a snack or side dish.
Ingredients
Instructions
Notes:*For egg-free version, use 3 tablespoons of ground flax mixed with 3/4 cup water or 3/4 cup full-fat coconut milk.
Check out our shop for products that teach kids to learn to love veggies! This includes veggie activity boxes, kid-safe knives, interactive placemats, and more.
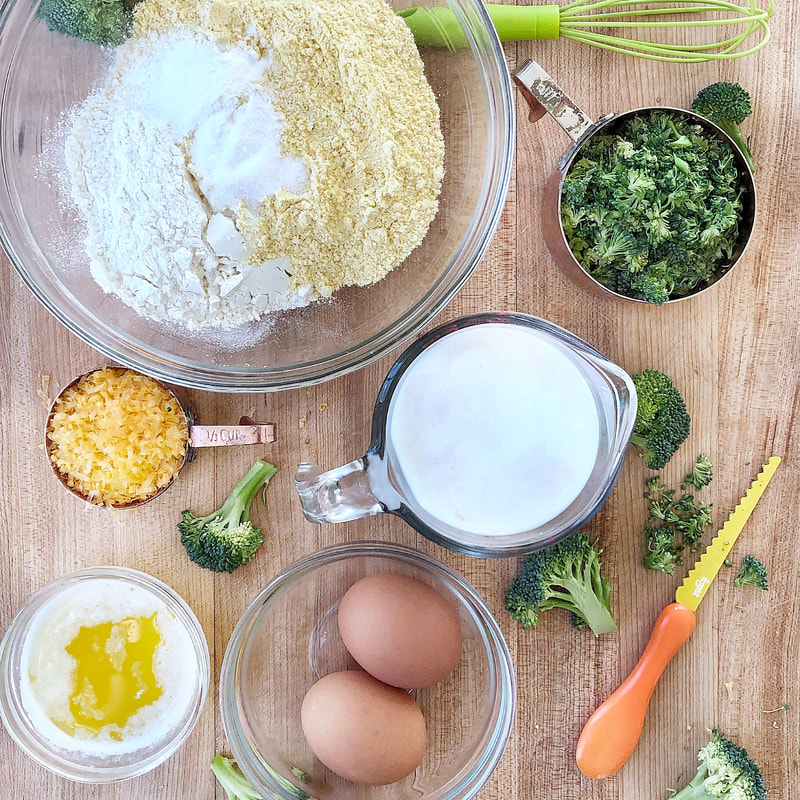
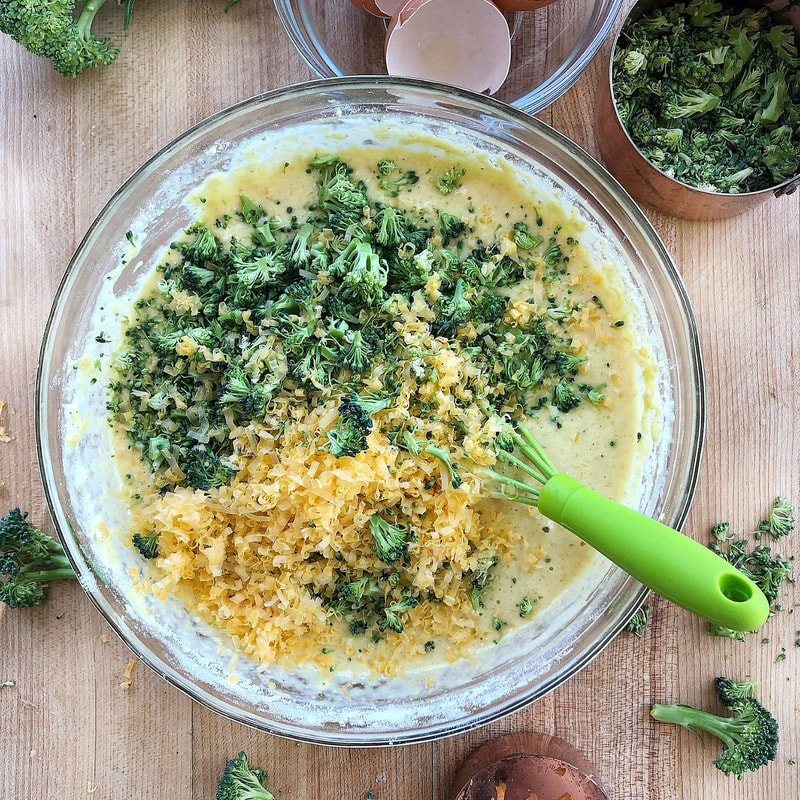
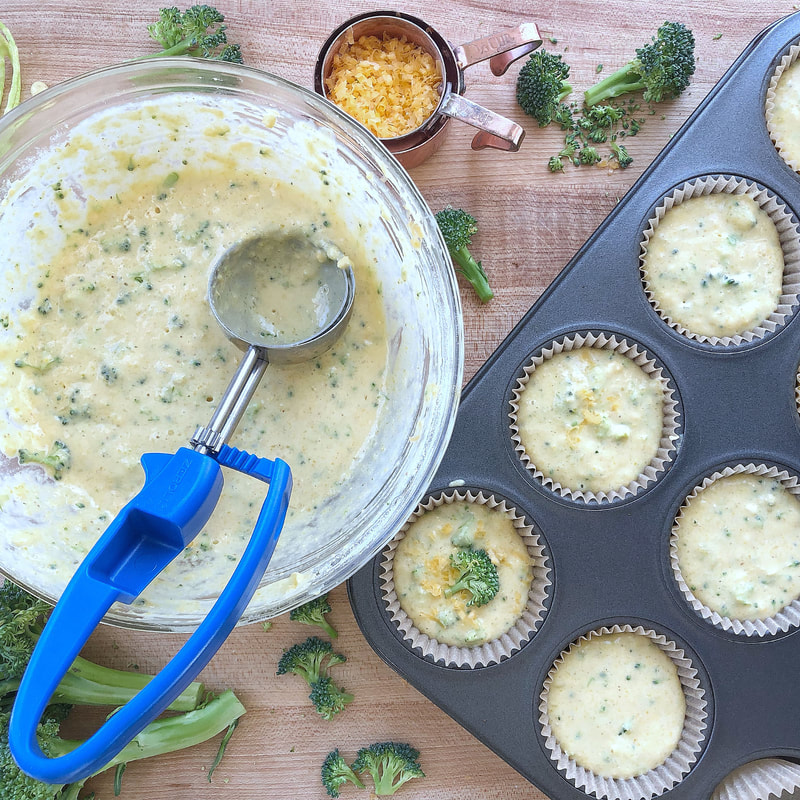
Have you ever made savory muffins? They are a fun and delicious way to get veggies into your day! Broccoli can be a little tricky for small hands to chop, so have your child help break apart the florets then practice sawing back and forth to trim the broccoli “leaves” off the “tree.” Chop the broccoli alongside your little chef and if he or she gets tired of cutting, your child can always help transfer the chopped broccoli to a measuring cup. Kids will also love to help by cracking the eggs, measuring the ingredients, and mixing everything all together. Enjoy!  This recipe was developed by Heather Staller, a mom of two boys, ages 6 and 3, and cooking instructor specializing in bringing cooking into preschool classrooms. After college, Heather knew she wanted to be a teacher, but first followed her lifelong dream of going to culinary school. Teaching cooking combines both of her passions, and she truly enjoys introducing young children to the joys of cooking with fresh ingredients. Find Heather on Instagram (@heather.happykidskitchen), where she shares inventive kid-friendly recipes and ideas for cooking with kids at home. Broccoli Cornbread MuffinsIngredients
Want some great products that teach kids to learn to love veggies?
Check out our shop for kid-safe knives, interactive placements, and veggie-themed activity boxes! We are excited to bring you this month's post from Katie Blauser, the creator of Eat Pretty Darling. Each month on our blog we feature a "Color of the Week" that corresponds with Veggie Buds Club's veggie of the month. December's theme is "Root Veggies Rule!", and we're having fun this month by celebrating PURPLE veggies in a yummy and kid-approved Purple Veggie Platter. 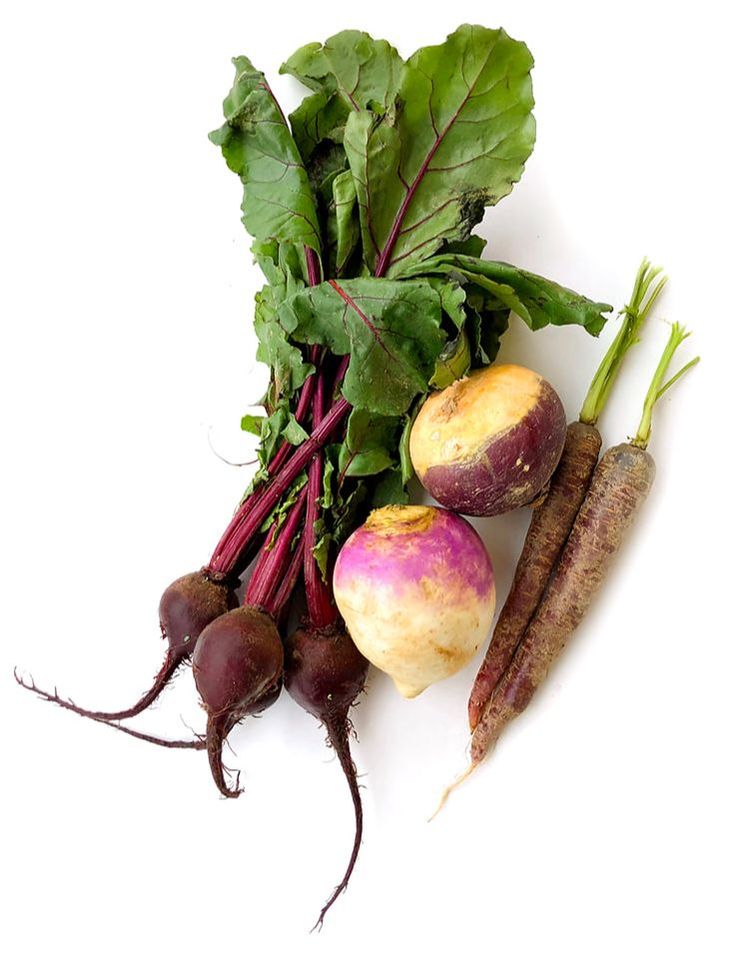 This recipe was developed by Katie Blauser, mama of two boys, wife of a picky eater, and food lover at Eat Pretty Darling. She believes in making food fun, healthy, & pretty! Katie’s not only outnumbered by boys in her little family, but also by picky eaters. She loves trying to find new ways to get both kids and adults to eat healthy while making food pretty yummy, pretty healthy, and pretty fun! Find Katie on Instagram (@eatprettydarling), where she shares colorful and cute food ideas for both picky and adventurous eaters. Color of the Week - PurpleThis week is all about PURPLE! The neat thing is, some of the veggies we found had purple outside, but no purple to be found inside. We stuck to root veggies and the color purple and found some new things to try. We’ve been playing the matching game from Veggie Buds Club so much this month that my oldest knew exactly what to look for and their names! He had fun seeing the drawings come to life in real vegetables at the store. We gathered up Purple carrots, Turnips, Rutabaga, and Beets. I thought it would be a fun week to see how all of the varying vegetables taste different. We sampled each one on it’s own and talked about how they taste. We all agree beets taste like dirt! Turnips were kind of spicy, Carrots were sweet, and Rutabaga was like french fries. I served them with plain yogurt but my oldest also wanted to see what they tasted like with different dips so we later added ketchup and peanut butter. 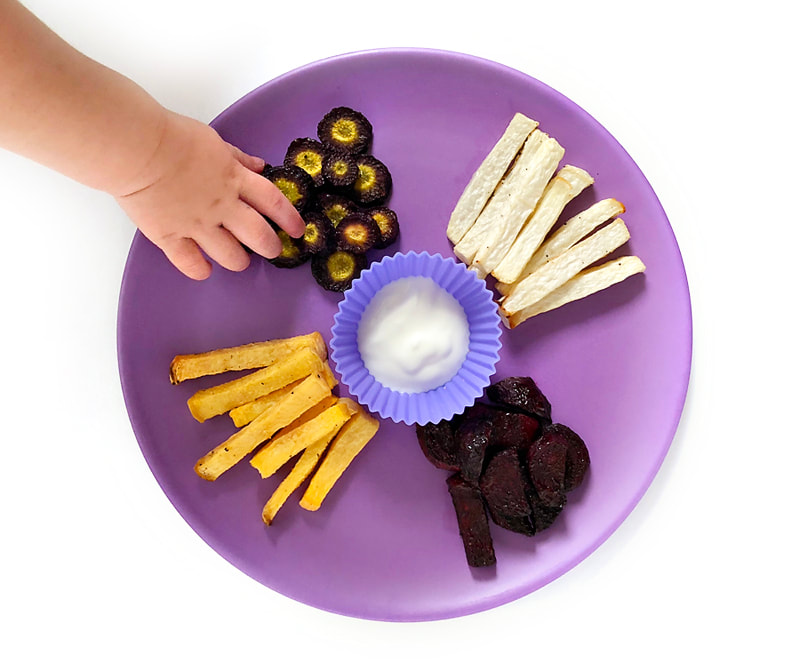 Purple Veggie PlatterIngredients You can use any root veggies!
Purple FoodsThere are more out there, but here’s a list to get started!
Want your kids to eat more veggies?Butternut squash and sweet potatoes can be added to so many dishes to increase nutrient density. From soup to macaroni and cheese to dips, these gorgeous orange veggies fit into them all! The hummus recipe below is a favorite in our house year-round with its savory taste and smooth texture. And this time of year it is a nice compliment to a tray of festive colored veggies. So whether you need a nutritious after school snack for your kids or a colorful dish for the neighborhood potluck, we have you covered! 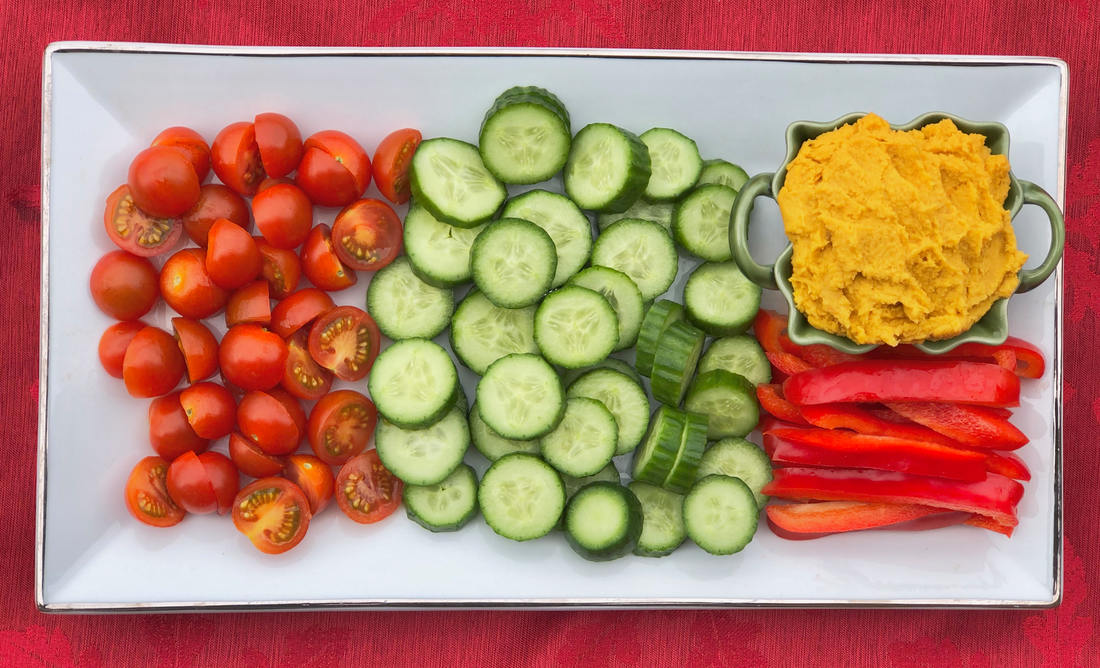 This recipe was developed by Noelle Martin, a Registered Dietitian and mom of three young boys. She has a passion for education, inspiring, and empowering moms to make healthy choices for themselves and their families. Noelle loves involving her children in food planning and preparation for their home and sees the kitchen as a perfect area for teaching both academic and life skills. Follow @MotherhoodandMeals on Instagram for Noelle's nutrition tips, recipes, product reviews, and motherhood moments. Butternut Squash (or Sweet Potato) HummusIngredients
Want your kids to eat more veggies?Check out our shop for interactive and fun products that teach kids that veggies are fun and tasty! In our shop you can find kid-safe knives, interactive placements, veggie-themed activity boxes, and more! 
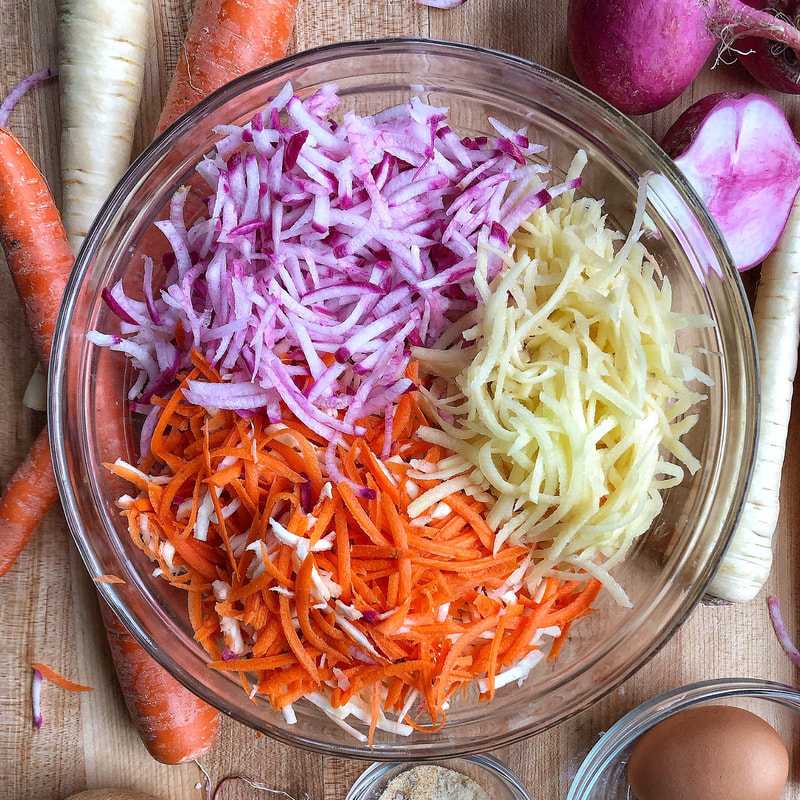
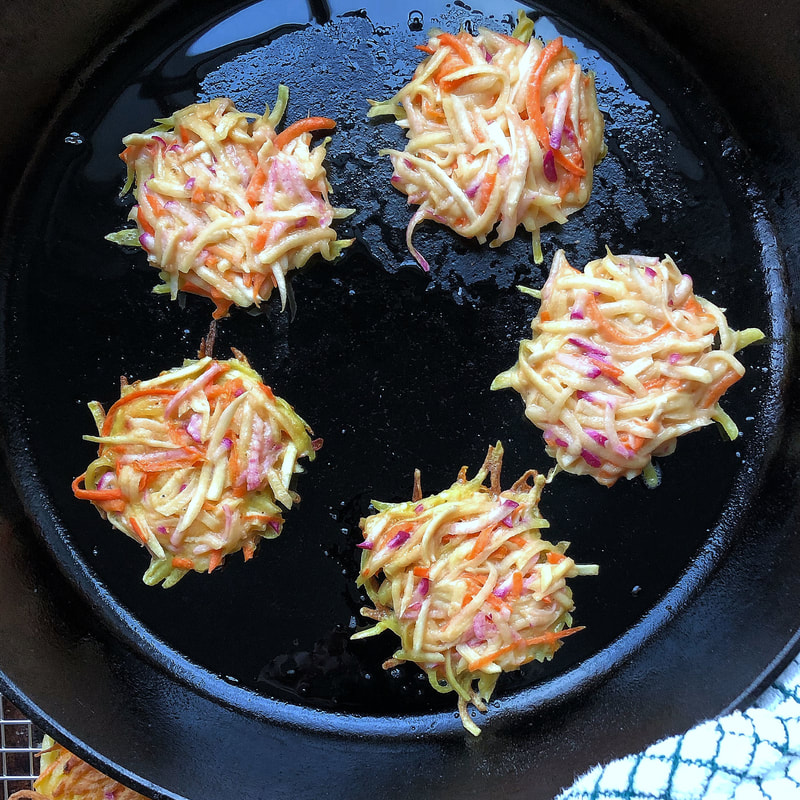
Turn a bowl full of winter root veggies into crispy fritters to enjoy any time of day. Top the veggie pancakes with a little Greek yogurt, sour cream, or even applesauce. If you have a French fry fan or potato lover, these are sure to be a hit!
This recipe was developed by Happy Kids Kitchen for Veggie Buds Club. "Learning to Love Veggies" Tip
Get your kids in the kitchen! Have your little chef help peel and grate the veggies, either by hand, with a box grater, or using a food processor. Crack the eggs together, then mix in a couple more ingredients and you are ready to cook.
 Root Veggie Latkes
Prep time: 10 MinCook time: 10 MinTotal time: 20 Min
Turn a bowl full of winter root veggies into crispy fritters to enjoy any time of day. Top the veggie pancakes with a little Greek yogurt, sour cream, or even applesauce. If you have a French fry fan or potato lover, these are sure to be a hit!
Ingredients
Instructions
Notes:*For egg-free latkes, substitute eggs for 2 tablespoons of ground flax mixed with 4 tablespoons of water. Latkes will be a little bit softer but still hold together. 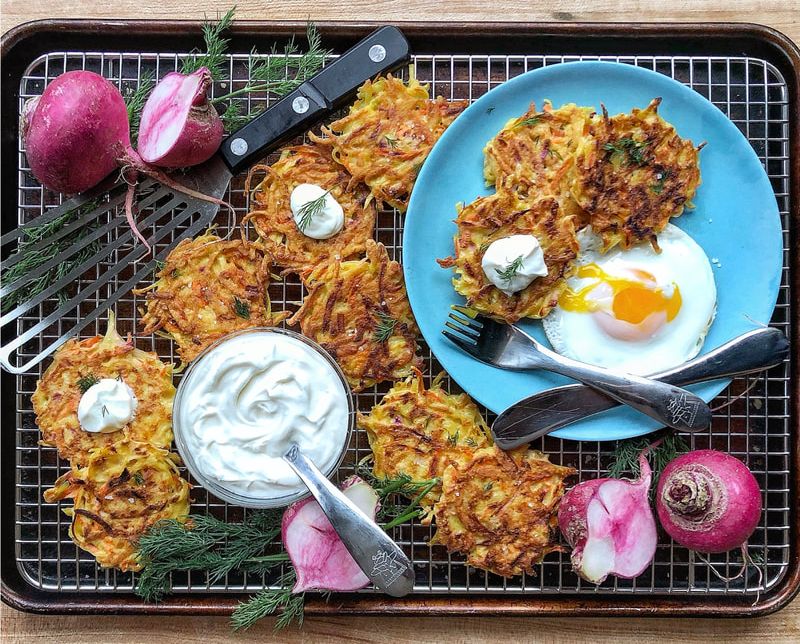
Check out our shop for products that teach kids to learn to love veggies! This includes veggie activity boxes, kid-safe knives, interactive placemats, and more.
Kale is such a powerhouse vegetable and yet one that kids often turn their nose up at if served “as is”. One recipe that is always a winner in our house is Kale Chips. Kale Chips are a great snack or side to any meal. I have even served them with scrambled eggs at breakfast! 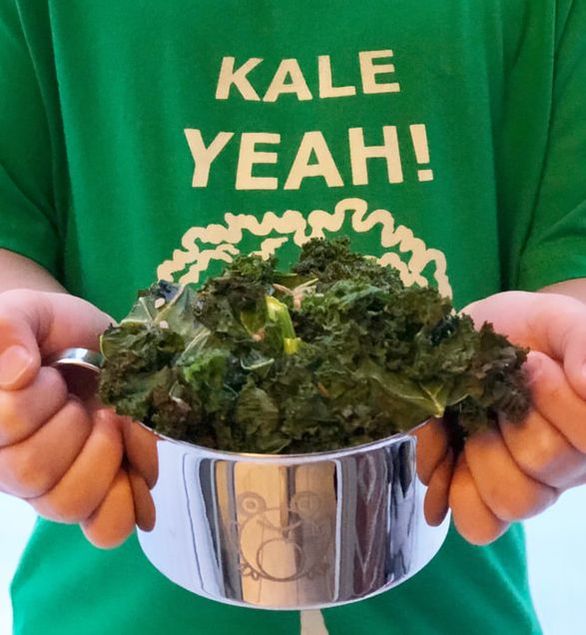 This recipe was developed by Noelle Martin, a Registered Dietitian and mom of three young boys. She has a passion for education, inspiring, and empowering moms to make healthy choices for themselves and their families. Noelle loves involving her children in food planning and preparation for their home and sees the kitchen as a perfect area for teaching both academic and life skills. Follow @MotherhoodandMeals on Instagram for Noelle's nutrition tips, recipes, product reviews, and motherhood moments. Kale ChipsBreak apart on head of fresh, washed kale...or better yet, have your children pull it apart! Place pieces on a baking stone or sheet and drizzle with avocado oil, maple syrup, and a small sprinkle of turmeric. Add sunflower seeds and roast at 400F for about 8-10 minutes or until kale is crispy. This can also be made in a toaster oven at 400 for 3-5 minutes. It’s that easy!!! That calls for a Kale Yeah! 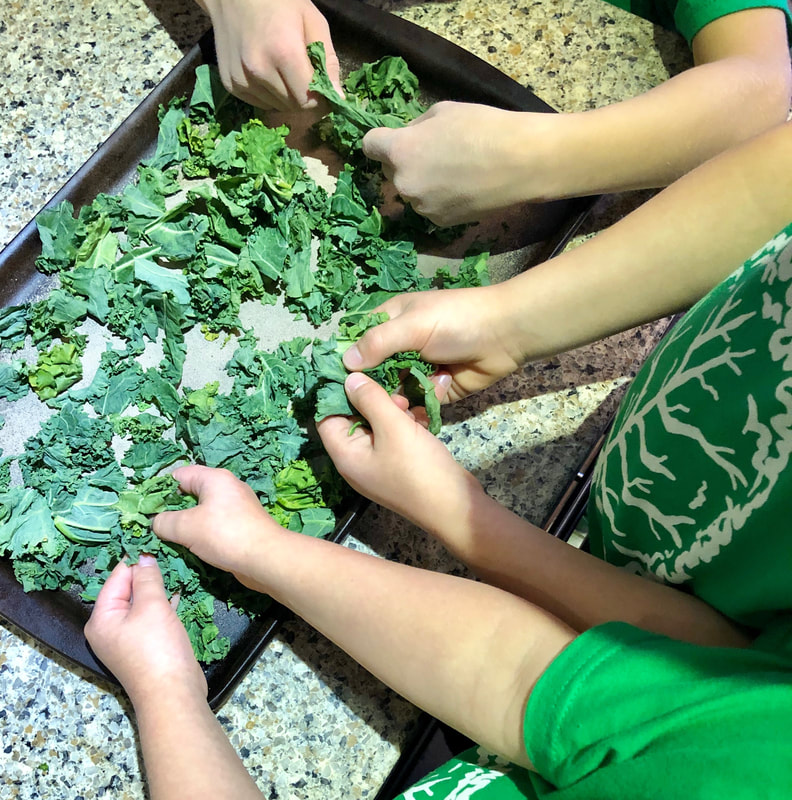 Want your kids to eat more veggies?Check out our shop for interactive and fun products that teach kids that veggies are fun and tasty! In our shop you can find kid-safe knives, interactive placements, veggie-themed activity boxes, and more! 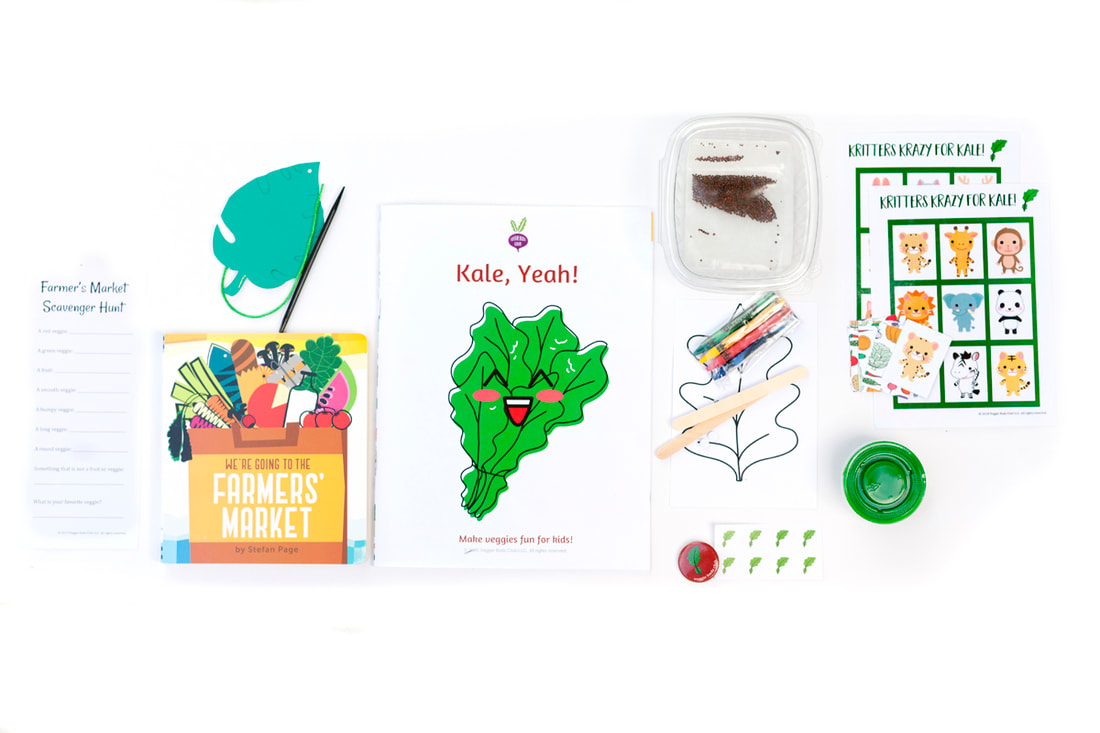 |